image_magick_ffi 0.0.1-dev.2  image_magick_ffi: ^0.0.1-dev.2 copied to clipboard
Dart bindings for ImageMagick C library which is used to edit images.
⚠️Attention⚠️ #
This is not a stable release. It is a development release for beta-testers to try out the plugin and report bugs. It is not recommended to use this plugin in production apps yet.
Contributors #
Special thanks to Piero5W11 for being the "FFI Master" and helping me a lot with this plugin.
ImageMagickFFi Plugin #
This plugin brings to you the ImageMagick C library MagickWand to use with dart.
Feel native #
Interact with the underlying ImageMagick C api just as you used to do in C (not with pointers, of course :P).
Features #
See for yourself from this image from ImageMagick's website some of the things you can do with this plugin:
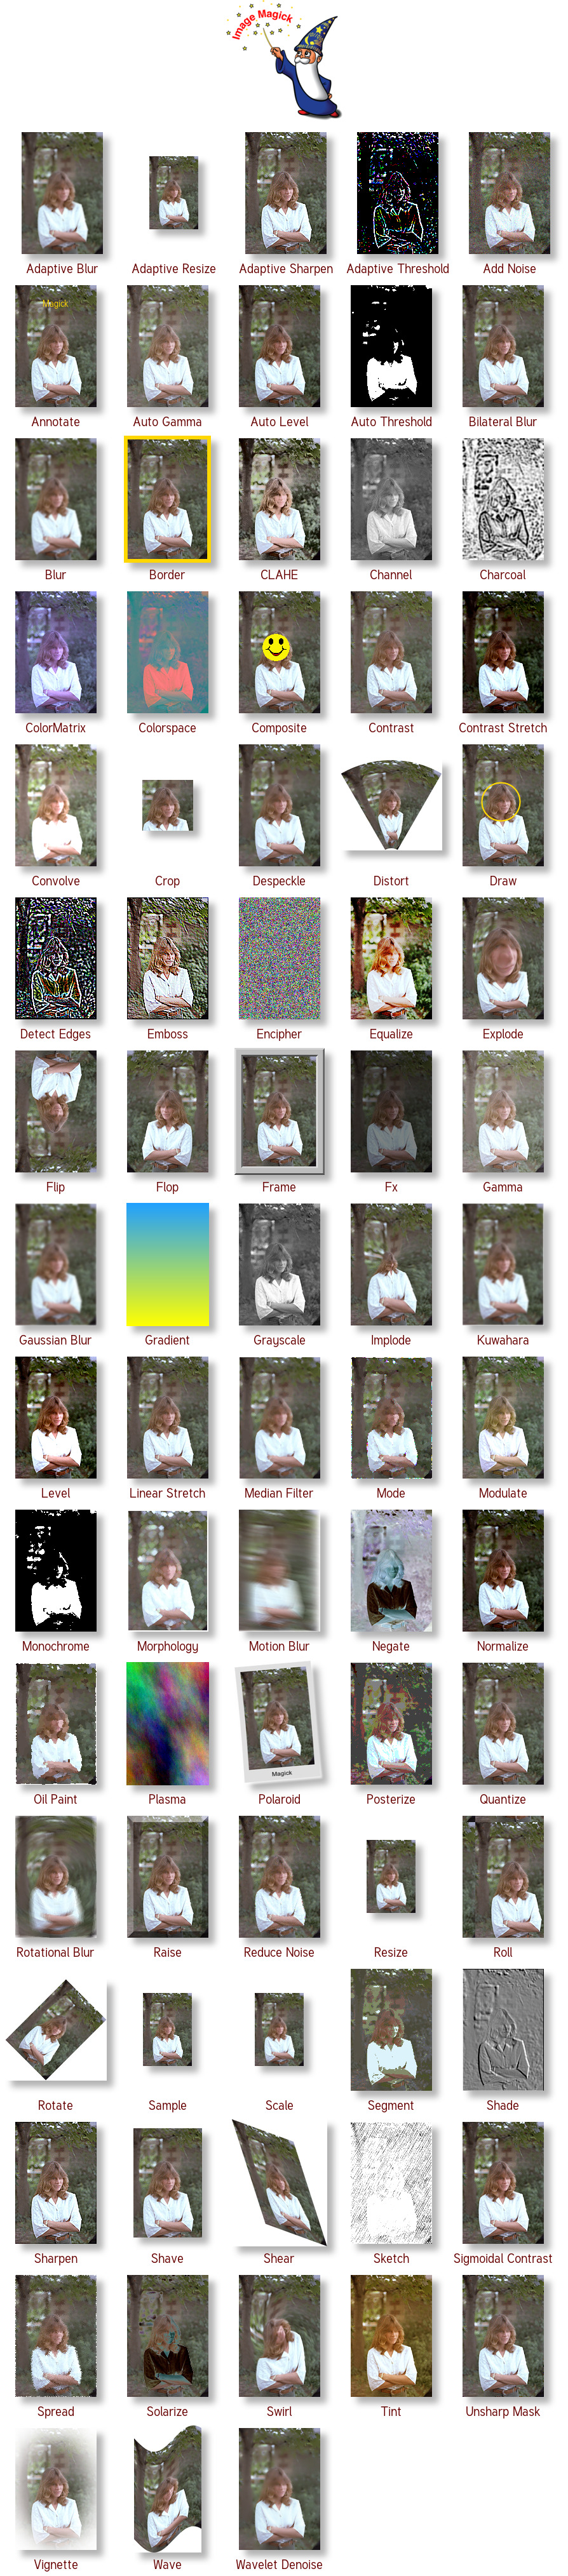
Have a look the #Usage section below for more insights.
Install #
image_magick_ffi: <latest_version>
Setup #
-
Currently there are 4 variants of the ImageMagick library that come with this plugin: Q8, Q16, Q8-HDRI, and Q16-HDRI.
-
You can choose which one you want to use.
-
Your decision must be made at the build-time (not runtime) of your project.
-
No need to worry about the files of other variants that you didn't choose in the previous step, only the files of the variant you had chosen will be bundled with your app when you build your app.
-
Windows
- Windows x64 (32 bits) and window x86 (32 bits) are both supported.
- To choose one of the variants add this to your
windows/CMakeLists.txtfile:
Note:# Use ImageMagick with Q8 and HDRI enabled. set(Q8 1) set(HDRI 1) - Do not try to
set(Q8 1)andset(Q16 1)at the same time, or an error will occur. - If you don't set any configuration then by default "Q8-No HDRI" will be used.
- Make sure you add the snippet above before this line
include(flutter/generated_plugins.cmake)
-
Android
Currently only arm64-v8a (64 bits) is supported. If you want to help add support to armeabi-v7a (32 bits), have a look here.
To choose one of the variants add this to your
android/build.gradlefile as a top-level statement:// Use ImageMagick with Q16 and HDRI enabled. ext { Q16 = 1 HDRI = 1 } -
Linux
Coming Soon (for sure)
-
Macos
Your contributions to provide the binaries are welcomed :)
-
IOS
Your contributions to provide the binaries are welcomed :)
Usage #
  import 'package:image_magick_ffi/image_magick_ffi.dart' as im;

// ...
@override
void initState() {
  im.initialize(); // initialize the plugin (can also be done before `runApp`)
  wand = im.MagickWand.newMagickWand(); // create a MagickWand to edit images
  super.initState();
}
// ...

// reads an image, then writes it in jpeg format
Future<String> _handlePress() async {
  try {
    setState(() => isLoading = true);

    await _wand.magickReadImage(_inputFile!.path); // read the image

    ///////////////////////// Do Some Operations On The Wand /////////////////////////

    im.KernelInfo kernel = im.KernelInfo(
      width: 3,
      height: 3,
      values: Float64List.fromList([1, 0, 1, 0, 1, 0, 1, 0, 1]),
    );
    await _wand.magickColorMatrixImage(
            colorMatrix: kernel); // apply color matrix to image
    await _wand.magickAdaptiveResizeImage(600, 800); // resize image
    await _wand.magickContrastImage(true); // apply contrast to image

    ///////////////////////////////////////////////////////////////////////////////////

    final String ps = Platform.pathSeparator;
    final String inputFileNameWithoutExtension =
            _inputFile!.path.split(ps).last.split('.').first;
    final String outputFilePath =
            '${_outputDirectory!.path}${ps}out_$inputFileNameWithoutExtension.png';

    await _wand.magickWriteImage(
            outputFilePath); // write the image to a file in the png format

    im.MagickGetExceptionResult e =
    _wand.magickGetException(); // get the exception if any
    if (e.severity != im.ExceptionType.UndefinedException) {
      throw e.description;
    }
    setState(() {
      _outputFile = File(outputFilePath);
      isLoading = false;
    });
    return 'Operation Successful!';
  } catch (e) {
    setState(() {
      _outputFile = null;
      isLoading = false;
    });
    return 'Error: ${e.toString()}';
  }
}

// ...
@override
dispose() {
  wand.destroyMagickWand(); // we are done with the wand
  im.dispose(); // we are done with the plugin
  super.dispose();
}
// ...
- For more info about code usage, have a look at the example app in this repo, there is a complete working app there that is ready for you to play around with.
Contributing #
- Feel free to open an issue if you have any problem or suggestion.
- Feel free to open a pull request if you want to contribute.
Metadata
Publisher
unverified uploader
Weekly Downloads
Metadata
Dart bindings for ImageMagick C library which is used to edit images.
Repository (GitHub)
View/report issues
Documentation
License
![]() unknown (license)
unknown (license)
Dependencies
ffi, flutter, plugin_platform_interface