mirrorfly_uikit_plugin 0.0.13  mirrorfly_uikit_plugin: ^0.0.13 copied to clipboard
A Mirrorfly Flutter UIKit plugin to Experience an outstanding real time messaging solution. The powerful communication that adds an extra mileage to build your chat app.
mirrorfly_uikit_plugin #
Table of contents #
Introduction #
Mirrorfly Flutter UIKit Plugin is a set of prebuilt UI Widgets that allows you to easily integrate an in-app chat with all the essential messaging features. Our development kit includes light and dark themes, text fonts, colors and more. You can customize these components to create an interactive messaging unique interface.
Requirements #
The minimum requirements for Flutter are:
- Visual Studio Code or Android Studio
- Dart 2.19.1 or above
- Flutter 2.0.0 or higher
The requirements for Android are:
- Android Lollipop 5.0 (API Level 21) or above
- Java 7 or higher
- Gradle 4.1.0 or higher
The minimum requirements for Chat SDK for iOS
- iOS 12.1 or later
Step 1: Let's integrate Plugin for Flutter #
Our Mirrorfly UIKit Plugin lets you initialize and configure the chat easily. With the server-side, Our solution ensures the most reliable infra-management services for the chat within the app. Furthermore, we will let you know how to install the chat Plugin in your app for a better in-app chat experience.
Plugin License Key #
Follow the below steps to get your license key:
- Sign up into MirrorFly Console page for free MirrorFly account, If you already have a MirrorFly account, sign into your account
- Once you’re in! You get access to your MirrorFly account ‘Overview page’ where you can find a license key for further integration process
- Copy the license key from the ‘Application info’ section
Step 2: Install packages #
Installing the Mirrorfly UIKit Plugin is a simple process. Follow the steps mentioned below.
Create Android dependency #
- Add the following to your root
build.gradlefile in your Android folder.
   allprojects {
    repositories {
        google()
        mavenCentral()
        jcenter()
        maven {
            url "https://repo.mirrorfly.com/release"
        }
    }
  }
Create iOS dependency #
- Check and Add the following code at end of your
ios/Podfile
post_install do |installer|
  installer.pods_project.targets.each do |target|
    flutter_additional_ios_build_settings(target)
    target.build_configurations.each do |config|
      config.build_settings['IPHONEOS_DEPLOYMENT_TARGET'] = '12.1'
      config.build_settings['ENABLE_BITCODE'] = 'NO'
      config.build_settings['APPLICATION_EXTENSION_API_ONLY'] = 'No'
      config.build_settings['BUILD_LIBRARY_FOR_DISTRIBUTION'] = 'YES'
      config.build_settings["EXCLUDED_ARCHS[sdk=iphonesimulator*]"] = "arm64"
     end
  end
end
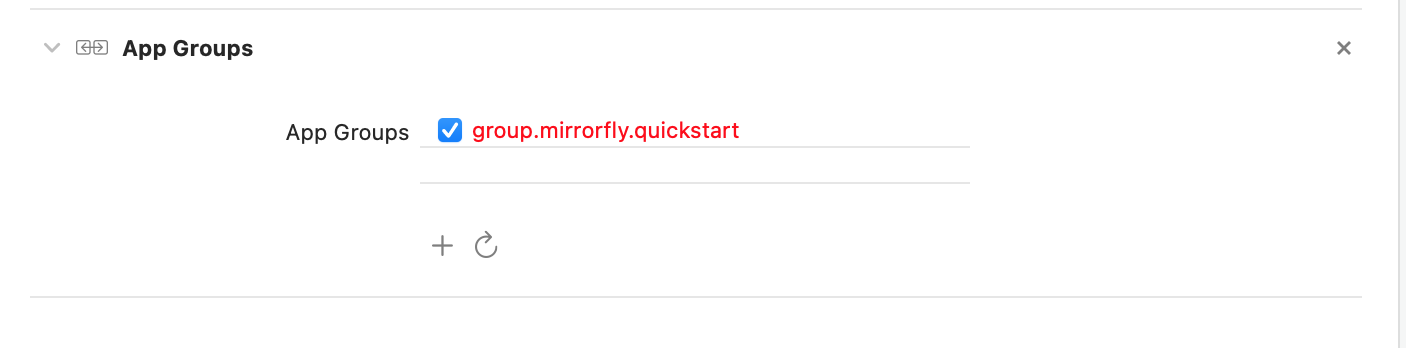
- Now, enable all the below mentioned capabilities into your project from
Xcode.
Goto Project -> Target -> Signing & Capabilities -> Click `+ Capability` at the top left corner -> Search for `App groups` and add the `App group capability`
Note: The App Group Must be same as
iOSContainerIdin json config file. See Integration Step 2.
Flutter #
- Add following dependency in
pubspec.yaml.
dependencies:
  mirrorfly_uikit_plugin: ^0.0.13
- Run
flutter pub getcommand in your project directory.
Step 3: Use the Mirrorfly UIKit Plugin in your App #
You can use all classes and methods just with the one import statement as shown below.
import 'package:mirrorfly_uikit_plugin/mirrorfly_uikit';
Integration #
In order to use the features of Mirrorfly UIKit Plugin for Flutter, you should initiate the MirrorflyUikit instance through user authentication with Mirrorfly server. This instance communicates and interacts with the server based on an authenticated user account, allowing the client app to use the Mirrorfly Plugin's features.
Here are the steps to integrate the Mirrorfly UIkit Plugin:
Step 1: Initialize the Mirrorfly UIKit Plugin #
To initialize the plugin, place the below code in your main.dart file inside main function before runApp().
 void main() {
  WidgetsFlutterBinding.ensureInitialized();
  MirrorflyUikit.instance.initUIKIT(  baseUrl: 'YOUR_BASE_URL',
      licenseKey: 'Your_Mirrorfly_Licence_Key',
      googleMapKey: 'Your_Google_Map_Key_for_location_messages',
      iOSContainerID: 'Your_iOS_app_Container_id',
      enableLocalNotification: true);
  runApp(const MyApp());
}
Step 2: Add Configuration json file #
create mirrorfly_config.json json file with configuration details then add the json file into under your assets folder(assets/mirrorfly_config.json).
Info Download config json file from Flutter UIKit docs
Step 3: Registration #
Use the below method to register a user in sandbox Live mode.
Info Unless you log out the session, make a note that should never call the registration method more than once in an application
Note: While registration, the below
registerUsermethod will accept thefcmTokenas an optional param and pass it across.The connection will be established automatically upon completion of registration and not required for seperate login.
try {
    var response = await MirrorflyUikit.registerUser(userIdentifier: uniqueId, fcmToken: "Your Google FCM Token");
    debugPrint("register user $response");
    //{'status': true, 'message': 'Register Success};
} catch (e) {
  debugPrint(e.toString());
}
Step 4: Navigate to Chat Dashboard #
Navigator.push(context, MaterialPageRoute(builder: (con)=> const DashboardView(title: "Chats",)));
Local Notification #
To enable or disable local notifications, use the enableLocalNotification parameter in MirrorflyUikit.instance.initUIKIT.
You can achieve handling local notification clicks as follows:
selectNotificationStream.stream.listen((String? jid) async {
// 'jid' represents the user JID who sent the message.
// You can customize the logic here, or navigate to a Chat page as shown in step 4.
});
Remote Push Notification #
To configure remote push notifications, you can set up the firebase_messaging package in your app and then send the FCM token through the registerUser method.
Additionally: #
- The handleReceivedMessage method is added to receive chat messages from FCM notifications, specifically for Android.
- For iOS, you will need to add a Notification Extension Service and follow the steps provided in the Notification Service class.
import mirrorfly_plugin
 override func didReceive(_ request: UNNotificationRequest, withContentHandler contentHandler: @escaping (UNNotificationContent) -> Void) {
        self.contentHandler = contentHandler
        bestAttemptContent = (request.content.mutableCopy() as? UNMutableNotificationContent)

        MirrorFlyNotification().handleNotification(notificationRequest: request, contentHandler: contentHandler, containerID: "containerID", licenseKey: "Your License Key")

    }
Call Feature #
Note: To enable the Call Feature in iOS, need to enable VOIP as shown below.

Getting Help #
Check out the Official Mirrorfly UIKit Flutter UIKit docs
Metadata
Publisher
Weekly Downloads
Metadata
A Mirrorfly Flutter UIKit plugin to Experience an outstanding real time messaging solution. The powerful communication that adds an extra mileage to build your chat app.
Documentation
License
![]() unknown (license)
unknown (license)
Dependencies
audioplayers, cached_network_image, camera, contacts_service, custom_image_crop, device_info_plus, emoji_picker_flutter, file_picker, flutter, flutter_keyboard_visibility, flutter_libphonenumber, flutter_local_notifications, flutter_profile_picture, flutter_svg, flutter_switch, fluttercontactpicker, fluttertoast, focus_detector, geocoding, geolocator, get, google_maps_flutter, grouped_list, http, image_picker, internet_connection_checker, intl, keyboard_dismisser, lottie, marquee, mirrorfly_plugin, oktoast, open_file_plus, package_info_plus, path, path_provider, permission_handler, photo_manager, photo_view, plugin_platform_interface, provider, qr_code_scanner, record, scrollable_positioned_list, share_plus, shared_preferences, swipe_to, url_launcher, video_player, yaml