mobile_scanner 3.4.0  mobile_scanner: ^3.4.0 copied to clipboard
A universal barcode and QR code scanner for Flutter based on MLKit. Uses CameraX on Android, AVFoundation on iOS and Apple Vision & AVFoundation on macOS.
mobile_scanner #

![]()
![]()

A universal scanner for Flutter based on MLKit. Uses CameraX on Android and AVFoundation on iOS.
Features Supported #
See the example app for detailed implementation information.
| Features | Android | iOS | macOS | Web |
|---|---|---|---|---|
| analyzeImage (Gallery) | ✔️ | ✔️ | ❌ | ❌ |
| returnImage | ✔️ | ✔️ | ❌ | ❌ |
| scanWindow | ✔️ | ✔️ | ❌ | ❌ |
| barcodeOverlay | ✔️ | ✔️ | ❌ | ❌ |
Platform Support #
| Android | iOS | macOS | Web | Linux | Windows |
|---|---|---|---|---|---|
| ✔ | ✔ | ✔ | ✔ | ❌ | ❌ |
Platform specific setup #
Android #
This packages uses the bundled version of MLKit Barcode-scanning for Android. This version is more accurate and immediately available to devices. However, this version will increase the size of the app with approximately 3 to 10 MB. The alternative for this is to use the unbundled version of MLKit Barcode-scanning for Android. This version is older than the bundled version however this only increases the size by around 600KB.
To use this version you must alter the mobile_scanner gradle file to replace com.google.mlkit:barcode-scanning:17.0.2 with com.google.android.gms:play-services-mlkit-barcode-scanning:18.0.0. Keep in mind that if you alter the gradle files directly in your project it can be overriden when you update your pubspec.yaml. I am still searching for a way to properly replace the module in gradle but have yet to find one.
You can read more about the difference between the two versions here.
iOS #
Add the following keys to your Info.plist file, located in NSCameraUsageDescription - describe why your app needs access to the camera. This is called Privacy - Camera Usage Description in the visual editor.
If you want to use the local gallery feature from image_picker NSPhotoLibraryUsageDescription - describe why your app needs permission for the photo library. This is called Privacy - Photo Library Usage Description in the visual editor.
Example,
<key>NSCameraUsageDescription</key>
<string>This app needs camera access to scan QR codes</string>

<key>NSPhotoLibraryUsageDescription</key>
<string>This app needs photos access to get QR code from photo library</string>
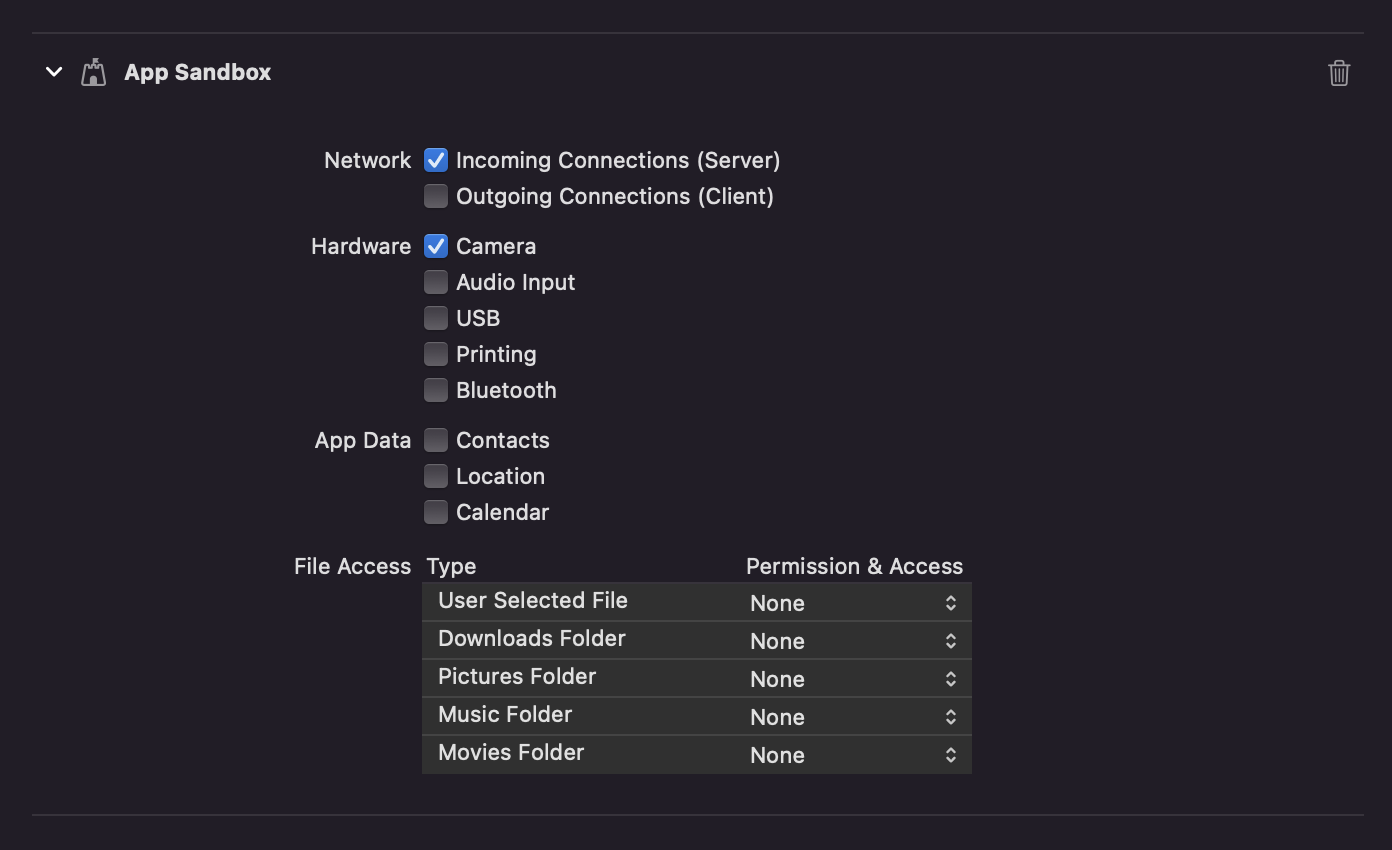
macOS #
Ensure that you granted camera permission in XCode -> Signing & Capabilities:
Web #
This package uses ZXing on web to read barcodes so it needs to be included in index.html as script.
<script src="https://unpkg.com/@zxing/library@0.19.1" type="application/javascript"></script>
Usage #
Import package:mobile_scanner/mobile_scanner.dart, and use the widget with or without the controller.
If you don't provide a controller, you can't control functions like the torch(flash) or switching camera.
If you don't set detectionSpeed to DetectionSpeed.noDuplicates, you can get multiple scans in a very short time, causing things like pop() to fire lots of times.
Example without controller:
import 'package:mobile_scanner/mobile_scanner.dart';

  @override
  Widget build(BuildContext context) {
    return Scaffold(
      appBar: AppBar(title: const Text('Mobile Scanner')),
      body: MobileScanner(
        // fit: BoxFit.contain,
        onDetect: (capture) {
          final List<Barcode> barcodes = capture.barcodes;
          final Uint8List? image = capture.image;
          for (final barcode in barcodes) {
            debugPrint('Barcode found! ${barcode.rawValue}');
          }
        },
      ),
    );
  }
Example with controller and initial values:
import 'package:mobile_scanner/mobile_scanner.dart';

  @override
  Widget build(BuildContext context) {
    return Scaffold(
      appBar: AppBar(title: const Text('Mobile Scanner')),
      body: MobileScanner(
        // fit: BoxFit.contain,
        controller: MobileScannerController(
          detectionSpeed: DetectionSpeed.normal,
          facing: CameraFacing.front,
          torchEnabled: true,
        ),
        onDetect: (capture) {
          final List<Barcode> barcodes = capture.barcodes;
          final Uint8List? image = capture.image;
          for (final barcode in barcodes) {
            debugPrint('Barcode found! ${barcode.rawValue}');
          }
        },
      ),
    );
  }
Example with controller and torch & camera controls:
import 'package:mobile_scanner/mobile_scanner.dart';

  MobileScannerController cameraController = MobileScannerController();

  @override
  Widget build(BuildContext context) {
    return Scaffold(
        appBar: AppBar(
          title: const Text('Mobile Scanner'),
          actions: [
            IconButton(
              color: Colors.white,
              icon: ValueListenableBuilder(
                valueListenable: cameraController.torchState,
                builder: (context, state, child) {
                  switch (state as TorchState) {
                    case TorchState.off:
                      return const Icon(Icons.flash_off, color: Colors.grey);
                    case TorchState.on:
                      return const Icon(Icons.flash_on, color: Colors.yellow);
                  }
                },
              ),
              iconSize: 32.0,
              onPressed: () => cameraController.toggleTorch(),
            ),
            IconButton(
              color: Colors.white,
              icon: ValueListenableBuilder(
                valueListenable: cameraController.cameraFacingState,
                builder: (context, state, child) {
                  switch (state as CameraFacing) {
                    case CameraFacing.front:
                      return const Icon(Icons.camera_front);
                    case CameraFacing.back:
                      return const Icon(Icons.camera_rear);
                  }
                },
              ),
              iconSize: 32.0,
              onPressed: () => cameraController.switchCamera(),
            ),
          ],
        ),
        body: MobileScanner(
          // fit: BoxFit.contain,
          controller: cameraController,
          onDetect: (capture) {
            final List<Barcode> barcodes = capture.barcodes;
            final Uint8List? image = capture.image;
            for (final barcode in barcodes) {
              debugPrint('Barcode found! ${barcode.rawValue}');
            }
          },
        ),
    );
  }
Example with controller and returning images
import 'package:mobile_scanner/mobile_scanner.dart';

  @override
  Widget build(BuildContext context) {
    return Scaffold(
      appBar: AppBar(title: const Text('Mobile Scanner')),
      body: MobileScanner(
        fit: BoxFit.contain,
        controller: MobileScannerController(
          // facing: CameraFacing.back,
          // torchEnabled: false,
          returnImage: true,
        ),
        onDetect: (capture) {
          final List<Barcode> barcodes = capture.barcodes;
          final Uint8List? image = capture.image;
          for (final barcode in barcodes) {
            debugPrint('Barcode found! ${barcode.rawValue}');
          }
          if (image != null) {
            showDialog(
              context: context,
              builder: (context) =>
                  Image(image: MemoryImage(image)),
            );
            Future.delayed(const Duration(seconds: 5), () {
              Navigator.pop(context);
            });
          }
        },
      ),
    );
  }
BarcodeCapture #
The onDetect function returns a BarcodeCapture objects which contains the following items.
| Property name | Type | Description |
|---|---|---|
| barcodes | List | A list with scanned barcodes. |
| image | Uint8List? | If enabled, an image of the scan. |
You can use the following properties of the Barcode object.
| Property name | Type | Description |
|---|---|---|
| format | BarcodeFormat | |
| rawBytes | Uint8List? | binary scan result |
| rawValue | String? | Value if barcode is in UTF-8 format |
| displayValue | String? | |
| type | BarcodeType | |
| calendarEvent | CalendarEvent? | |
| contactInfo | ContactInfo? | |
| driverLicense | DriverLicense? | |
| Email? | ||
| geoPoint | GeoPoint? | |
| phone | Phone? | |
| sms | SMS? | |
| url | UrlBookmark? | |
| wifi | WiFi? | WiFi Access-Point details |
Metadata
Publisher
Weekly Downloads
Metadata
A universal barcode and QR code scanner for Flutter based on MLKit. Uses CameraX on Android, AVFoundation on iOS and Apple Vision & AVFoundation on macOS.
Repository (GitHub)
View/report issues
License
![]() unknown (license)
unknown (license)
Dependencies
flutter, flutter_web_plugins, js