netflix_appbar 1.0.1  netflix_appbar: ^1.0.1 copied to clipboard
Netflix AppBar Imitation. The package will help you to simulate the Netflix app menu behavior.
NETFLIX APPBAR IMITATION PACKAGE #
Dremar Design
WATCH THE VIDEO EXAMPLE #
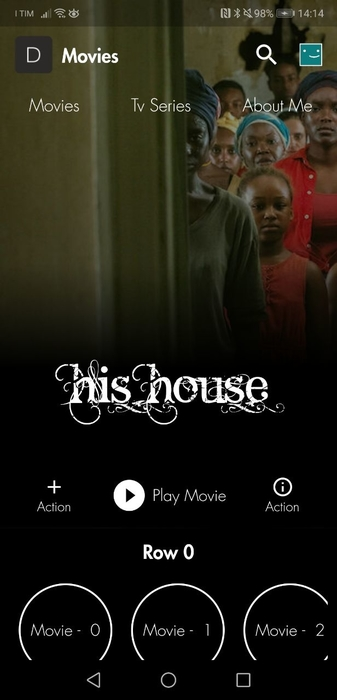
The package will allow you to simulate the Netflix app menu behavior.
The class i created is just a simple imitation, so there can be stack memory problems or graphical performance issues on older devices.
HOW TO USE IT
You need page_transition (at least version 1.0.0) and after_layout (at least version 1.0.5) in order to use this package.
After you have imported it, you should create your personalized Stateful or Stateless Widget classes. After you did this, on your main default function you have to create a list of objects and to return the NetflixAppBar instance.
-
LIST OF OBJECTS
Let's create a simple list of objects
//we initialize the list List<DrTextTransitionTitleObject> titles = new List(); //we add a new Widget class, one of them you created titles.add(new DrTextTransitionTitleObject("title", "slug", your_class_name())); -
NetflixAppBar ARGUMENTS
 NetflixAppBar(List<DrTextTransitionTitleObject> titles, int duration,
    {Widget header,
    double headerHeight = 0,
    Color background = Colors.transparent,
    Color appBarColor,
    int dumping = 100,
    double titlePaddingLeft = 16,
    double titlePaddingRight = 15,
    double titleActiveFontSize = 20,
    double maxOpacity = 0.6,
    double initialOpacity = 0,
    bool pinned = false,
    TextStyle titleStyles = const TextStyle(
        color: Colors.white, fontSize: 16, fontWeight: FontWeight.bold),
    Widget leading,
    Function(ScrollController, String, NetflixAppBar) onScreenChange,
    MainAxisAlignment mainAxisAlignment})
| TITLE | TYPE | DESCRIPTION | DEFAULT VALUE |
|---|---|---|---|
| titles | List | The list of objects you initially created | null |
| duration | int | The duration (in milliseconds) of your menu animation | null |
| header | Widget | The AppBar header, it's optional | null |
| headerHeight | double | The AppBar header height | 0 |
| background | Color | The main color of the Scaffold NetlixToolbar will return | Colors.transparent |
| appBarColor | Color | The main color of the AppBar | Colors.purpleAccent.withOpacity(0.7) |
| dumping | int | More the value is bigger more the user has to scroll down before the AppBar disappears | 100 |
| titleStyles | TextStyle | The Style you want to set up to your menu titles | const TextStyle( color: Colors.white, fontSize: 16, fontWeight: FontWeight.bold), |
| titlePaddingLeft | double | The padding left that should have the titles' row | 16 |
| titlePaddingRight | double | The padding right that should have the title row | 15 |
| titleActiveFontSize | double | The font size of the Title Label during a transition | 20 |
| leading | Widget | The leading AppBar Widget | null |
| pinned | bool | If you want the AppBar always fixed on the top set pinned to true | false |
| initialOpacity | double | The initial and minimum opacity of the AppBar | 0 |
| maxOpacity | double | The max opacity the AppBar can reach while the user scrolls down. AppBar opacity will reach your value following the dumping value you set | 0.6 |
| onScreenChange | Function(ScrollController, String, NetflixToolbar) | A function that will allow you to get the control of the current screen | null |
| mainAxisAlignment | MainAxisAlignment | AppBar title row mainAxisAlignment | MainAxisAlignment.spaceBewteen when titles length is > 2; MainAxisAlignment.start when titles length is <= 2 |
Example:
    List<DrTextTransitionTitleObject> titles = new List();

    titles.add(new DrTextTransitionTitleObject("Movies", "movies", Movies()));
    titles.add(new DrTextTransitionTitleObject("Tv Series", "tv", Tv()));
    titles.add(new DrTextTransitionTitleObject("About Me", "about", AboutUs()));

    int milliseconds = 700;

    TextStyle titleStyles = const TextStyle(
        fontFamily: "Dr1",
        color: Colors.white,
        fontSize: 18,
        fontWeight: FontWeight.bold);

    instance = NetflixAppBar(
      titles,
      milliseconds,
      initialOpacity: 0.3,
      maxOpacity: 1,
      dumping: 100,
      titleStyles: titleStyles,
      titleActiveFontSize: 21,
      appBarColor: Colors.black,
      background: Colors.black,
      onScreenChange:
          (ScrollController controller, String slug, NetflixAppBar instance) {
        print("Controller received correctly \n We are on $slug screen");
        this.currentSlug = slug;
        this.instance = NetflixAppBar.getInstance();
        var newTitles = this.instance.titles;

        //....

      },
    );
    return instance;
IMPORTANT #
after the first screen transition the class that wraps NetflixAppBar instance will be disposed, so be careful.
STATIC FUNCTIONS #
-
getInstance()
NetflixAppBar.getInstance() will return the current NetflixAppBar instance. So you can get info about current titles, attributes, and so on
-
getContext()
NetflixAppBar.getContext() will return the current NetflixAppBar instance context
-
notify()
NetflixAppBar.notify() will allow you to update graphical elements on the current displayed screen
-
goBack()
NetflixAppBar.goBack() will allow you to return to the previous screen
-
DrTextTransitionTitleObject ARGUMENTS
DrTextTransitionTitleObject(String name, String heroTag, Widget function,
      {List<DrTextTransitionTitleObject> newTitles,
      bool personalized = false,
      Widget overrideWidget,
      Function overrideAction,
      TextStyle primaryStyle,
      Widget header,
      double headerHeight,
      double paddingLeft = 0})
| TITLE | TYPE | DESCRIPTION | DEFAULT VALUE |
|---|---|---|---|
| name | String | The title value | null |
| heroTag | String | This is the label slug, it allows to the app to use it as an Hero Widget tag for the animations | null |
| function | Widget | This is the Widget you want to show up when a user clicks on the label. If you set an overrideAction function then you can set the function property to null | null |
| newTitles | List | The list of titles you want to show up when you click on that specific title | null |
| personalized | bool | If you set personalized to true it means you want to create a your own Widget for that title on the AppBar. The default widget is an Animated Text View | false |
| overrideWidget | Widget | If personalized is true you must specify an overrideWidget. It is the Widget Flutter will show for that title on the AppBar | null |
| overrideAction | Function | It is helpful when you want to trigger a personalized function when a user clicks on that title on the menu | null |
| primaryStyle | TextStyle | The style you want to give to the default TextView widget that shows the title name on the AppBar | null |
| paddingLeft | double | The padding left you want to give to the default TextView widget that shows the title name on the AppBar | 0 |
| header | Widget | When a user clicks on the title and you don't set an overrideAction this is the new widget will appear on the top of the AppBar | null |
| headerHeight | double | The header widget height | null |
Example:
    List<DrTextTransitionTitleObject> titles = new List();
    List<DrTextTransitionTitleObject> tvTitles = new List();

    var movies = new Movies();
    var tv = new Tv();

    titles.add(new DrTextTransitionTitleObject("Movies", "movies", movies,
        header: switchHeader("movies")));
    titles.add(new DrTextTransitionTitleObject("Tv Series", "tv", tv,
        newTitles: tvTitles, header: switchHeader("movies")));
    titles.add(new DrTextTransitionTitleObject("About Me", "about", AboutUs()));

    tvTitles.add(new DrTextTransitionTitleObject("Tv Series", "tv", tv,
        newTitles: titles,
        header: switchHeader("tv"),
        personalized: true,
        overrideWidget: Icon(
          Icons.search,
          color: Colors.white,
          size: 32,
        )));
    tvTitles.add(new DrTextTransitionTitleObject("Movies", "movies", movies,
        newTitles: titles, paddingLeft: 35));
WEB IMPLEMENTATION #
CLICK HERE to see a web example #
CONTACTS #
You can contact me through Telegram: @dremar_design
DONATIONS
CLICK HERE if you want to pay me a coffee :)
Metadata
Publisher
unverified uploader
Weekly Downloads
Metadata
Netflix AppBar Imitation. The package will help you to simulate the Netflix app menu behavior.
Documentation
License
![]() MIT (license)
MIT (license)
Dependencies
after_layout, flutter, flutter_web_plugins, page_transition