readid_flutter 4.113.1  readid_flutter: ^4.113.1 copied to clipboard
A Flutter plugin for integrating ReadID's native iOS and Android SDKs. This plugin wraps ReadID's native SDKs.
ReadID Flutter Plugin #
The ReadID Flutter Plugin wraps ReadID's native iOS (Swift) and Android (Kotlin) UI SDKs behind a Dart interface for use from within your Flutter app.
This plugin wraps the client-server and client-only versions of the native SDKs. Please contact your technical contact in Inverid or our support for bug reports or feature requests.
Please be aware that a license for ReadID and access to the native SDKs is needed to be able to use this Flutter Plugin.
- ReadID Flutter Plugin
- Features
- Flows
- UI/UX
- Document selection screen
- Instruction animations screens
- Manual input screen
- VIZ confirmation screen
- VIZ result screen
- NFC reading screen
- NFC result screen
- NFC data result section
- NFC security result section
- Configuration
- Configuration options available for all flows
- Configuration options available for all VIZ flows
- Configuration options available for all NFC flows
- VIZOnlyOnePageFlow configurations
- VIZOnlyBothSidesFlow configurations
- NFCOnlyFlow configuration options
- NFCWithAccessControlFlow and NFCWithVIZFallbackFlow configuration options
- NFCWithVIZFlow and NFCWithVIZBothSidesFlow configurations
- NFC chip support
- Document and device NFC location
- Styling
- Colors
- iProov
- Optical Orchestration
- Flows
- Advanced
- ReadID Flutter Plugin Data Model Documentation
- License
- Help and support
Requirements #
- Dart SDK version 3.1 and above.
- Flutter SDK version 2.5.0 and above.
- iOS 14 and above.
- Android API Level 26 (Android 8) and above.
- A valid ReadID Access Key and URL.
Refer to the native Android and iOS tech guides on the Documentation portal for platform specific requirements.
Limitations and Known Issues #
A subset of the native SDK API is not available in the Flutter wrapper due to technical limitations. Most notably, this includes:
- All
Flowconfiguration properties have a setter but no getter, i.e. you can configure all settings but you cannot query configuration settings. vizConfirmationScreenConfiguration,vizResultScreenConfiguration, andisTouchToFocusEnabled(Android only) are not available- In the client-only version of the SDK, you can only configure a custom masterlist statically, not dynamically. See Custom CSCA Master List (client-only) for more information.
Refer to the native Android and iOS tech guides on the Documentation portal for platform specific limitations and known issues.
Repository Contents #
README.md- This document.example- A demonstration Flutter app using this Flutter plugin.lib- Flutter (Dart) side of the SDK plugin.android- Android native side of the plugin.ios- iOS native side of the plugin.
Installation #
You can install this package by running the following command in your Flutter
project: flutter pub add readid_flutter
Android #
We recommend using the latest Android Studio.
Add ReadID SDK and Configure Build
- Add repositories to your
build.gradle(root scope):
allprojects {
    repositories {
        google()
        maven {
            url "s3://maven-readid-7npn738r9muhb5r6mm97b7pxcck84euw1a-s3alias"
            authentication { awsIm(AwsImAuthentication) }
        }
    }
}
- Configure AWS credentials. Create ~/.aws/credentials with contents:
[default]
aws_access_key_id=<your_key_id>
aws_secret_access_key=<your_access_key>
Do not add a newline after aws_secret_access_key.
The aws_access_key_id and aws_secret_access_key are provided to you by Inverid.
- Set Java compatibility to Java 8 in your build.gradle (Module: app):
android {
    compileOptions {
        // Sets Java compatibility to Java 8
        sourceCompatibility JavaVersion.VERSION_1_8
        targetCompatibility JavaVersion.VERSION_1_8
    }
}
- Add AndroidX properties to your gradle.properties (project root). Create if it does not exist:
android.useAndroidX=true
- Add required features for NFC: Add the nfc feature to your AndroidManifest. xml.
<uses-feature
  android:name="android.hardware.nfc"
  android:required="true"/>
- Optional: add required features for VIZ: Add camera and autofocus features to your AndroidManifest.xml. As an alternative, you can perform runtime checks before starting ReadID, in case you want to support devices without camera or without auto focus.
<manifest>
...
  <uses-feature
    android:name="android.hardware.camera"
    android:required="true"/>
  <uses-feature
    android:name="android.hardware.camera.autofocus"
    android:required="true"/>
</manifest>
If you start any NFC flow and the device does not have NFC support, then the plugin will throw
an NFCNotSupportedException. You should perform runtime checks before starting ReadID and handle
the NFCNotSupportedException. The exception here is that if you make use of
the NFCWithVIZFallbackFlow, then the plugin will perform the check, and will fall back to a second
VIZ capture if the device does not support NFC.
Finally, do not forget to set the Android minSdkVersion to at least 26
iOS #
We recommend using the latest version of Xcode.
The ReadID_UI.xcframework include simulator builds that provide mockups for features that are not available on the simulator, especially those that involve the camera or NFC reader. When using ReadID UI VIZ, using the simulator requires you to configure a movie to simulate camera input. See Simulating VIZ capture in the iOS Simulator for more information. You can use the sample code to get started quickly or you can integrate the ReadID UI SDK into your own app as follows:
- On the General configuration tab of your App Target configuration, add ReadID_UI.xcframework to 'Frameworks, Libraries, and Embedded Content'.
- On the Signing & Capabilities configuration tab add the
Capability
Near Field Communication Tag Reading - Add
NSCameraUsageDescriptionto the App's Info.plist file. The camera is needed to scan the document, including the MRZ. - Add
NFCReaderUsageDescriptionto the App's Info.plist. - On the Apple developer portal create a distribution provisioning profile and enable
capability
NFC Tag Reading. - Copy the snippet below into your Info.plist. This is the list of application identifiers that are supported, see Core NFC documentation for more information.
<key>com.apple.developer.nfc.readersession.iso7816.select-
identifiers</key>
<array>
<string>A0000002471001</string>
<string>A00000045645444C2D3031</string>
</array>
In order to start the ReadID flow, you must include the native ReadID frameworks (.xcframework) in
your Flutter ios folder.
Please consult your onboarding specialist so you can get access
to ReadID_Interop.xcframework and ReadID_UI.xcframework.
Once you have obtained these frameworks, be sure to add them to your iOS project. You can do so by
opening your project in Xcode, select the main target, go to General -> Frameworks, Libraries and
Embedded Content and drag them there. Please make sure that the Embed & Sign option is selected
for all of them.
Afterwards, you will need to edit the Podfile of your Pods project. Make sure the post_install
code block looks like this:
post_install do |installer|
  installer.pods_project.targets.each do |target|
    if target.name == 'readid_flutter'
      xcframeworks_paths = ['../ReadID_Interop.xcframework', '../ReadID_UI.xcframework']
      xcframeworks_group = installer.pods_project.main_group.find_subpath('Frameworks', true)
      xcframeworks_paths.each do |path|
        file_ref = xcframeworks_group.new_file(path)
        target.frameworks_build_phase.add_file_reference(file_ref, true)
      end
    end
  end
  installer.pods_project.targets.each do |target|
    flutter_additional_ios_build_settings(target)
  end
end
Make sure you include the NFCReaderUsageDescription and NSCameraUsageDescription keys in
your Info.plist with descriptions about why you want to use the NFC and Camera capabilities.
For example:
<key>NFCReaderUsageDescription</key>
<string>Read an electronic passport or drivers license</string>
<key>NSCameraUsageDescription</key>
<string>We need access to the camera to capture the document before reading the NFC chip</string>
To access a particular function of the NFC chip, it is required to select the corresponding
applications first. Apple
requires you to specify these explicitly in your Info.plist.
Declare com.apple.developer.nfc.readersession.iso7816.select-identifiers as follows:
<key>com.apple.developer.nfc.readersession.iso7816.select-identifiers</key>
	<array>
		<string>A0000002471001</string>
		<string>A00000045645444C2D3031</string>
	</array>
Lastly, also enable the NFC Tag Reading capability in your target. You can do so by:
- Open your iOS Flutter project in Xcode.
- Click on your app target.
- Go to
Signing & Capabilitiestab. - Click the
+ Capabilitybutton. - Add the Near Field Communication Tag Reading.
Client-server vs client-only #
In most situations, the ReadID client-server SDK is the most suitable solution. If you need to use the client-only solution this can be accomplished in iOS simply by adding the correct version of the xcframework. For Android, in your app's build gradle you need to add the following line:
gradle.ext.readIDFlavor = 'clientOnly'
Getting Started #
To use the SDK, you must obtain credentials first. You can obtain your AccessKey and URL by contacting your onboarding specialist.
Once you have a valid token (obtained via Credentials), you can start to setup a flow (for example
an NFCWithAccessControlFlow or VIZOnlyOnePageFlow). With your newly created flow, you can start
using the ReadID plugin.
The most simplest form is the following:
final myFlow = NFCWithAccessControlFlow()
                ..baseUrl = 'Your URL'
                ..accessKey = 'Your access key'
                ..allowedDocumentTypes = [DocumentType.passport,
                DocumentType.identityCardTD1];
final readIDResult = await ReadID().startReadID(flow: myFlow);
This will start the ReadID plugin and will allow your users to verify themselves using a passport or
an identity card.
The readIDResult will contain information about the session the user just performed. Depending on
the flow that was selected, it's possible to retrieve the users name, photo image, and more.
For instance, if the user scanned their identity document using NFC, you can retrieve their face image in the following way:
final faceImage = readIDResult.nfcResult?.faceImage;
The faceImage is a regular UInt8List, which you can display using the Image class in Flutter,
for example.
Sample code #
For a simple ReadID experience that is ready to run out-of-the-box, check out the Flutter example project. Note that ReadID is not supported on an iOS or Android simulator, you have to run it on a physical device.
In the example app folder, open the main.dart file. Here you will see instructions on how to setup
your base URL and access key.
// Put your API credentials in a json file and pass them using --dart-define-from-file
final String _baseUrl = const String.fromEnvironment('BASE_URL');
// Note: You should have different access keys for each server environment
final String _accessKey = const String.fromEnvironment('ACCESS_KEY');
NOTE: Never commit or store your AccessKey or URL in publicly accessible code. Always use secure methods to store and retrieve these credentials in production environments.
Android's Process Termination #
Android may kill an app's process to reclaim memory, prioritizing the termination of background apps or those not performing active tasks, with minimal impact managed through proper app lifecycle handling. To handle this we have a method that can be called in Flutter
resumeReadID();
The resumeReadID() function is designed to resume passing the readIDResults to the Flutter app.
It checks for previous results from onActivityResult() and will pass along the last one, if we
have one, back to the app.
You can see in ~/example inside the main.dart on how you could call this from the initState()
Handling errors #
The startReadID function can throw an error, for example the user didn't scan their identity
document correctly. These errors are Failure objects. A list of errors that you can encounter are
listed below:
| Exception | Description |
|---|---|
| backgroundTimeout | App was in the background longer than the configured interval. |
| sessionExpired | The session with the server has expired. |
| authorisationError | Indicates that you have configured a wrong or invalid server access key or oAuth token. |
| serverSessionError | Happens if the server is either unavailable or encountered an error while processing a request. |
| sslError | This can happen if SSL pinning is enabled and the SDK was not able to accomplish a secure connection to the server. The cause could be an expired or incorrect certificate. |
| nfcAccessControlError | Indicates incorrect NFC chip credentials (e.g. BAC access key) due to an OCR error or incorrect user input. It also happens if the user changed the identity document between VIZ capture and NFC reading, which means the credentials are meant for a different chip and are therefore wrong. |
| connectionError | Indicates that a network error occurred while attempting to communicate with the server. A message with "Try again" and "Cancel" option was shown, but the user was not able to succeed and cancelled. |
| nfcError | Happened most likely because of a weak NFC connection with the chip. The user was not able to read the chip, and the OS NFC reading timeout has occurred. |
| userCancelled | User cancelled the reading process by the following methods: User pressed skip on the NFC read screen or the user closed using modal screen. |
| cameraPermissionDenied | The user did not give permission to use the camera. |
| noChip | According to our records, the document does not have a chip. |
| unsupportedDocument | The document is not supported by ReadID. |
| wrongDocumentType | This failure is thrown when an ICAO document (passport or identity card) MRZ is scanned and an EDL document (driving licence) is used to be read or vice versa. |
| tooManyRequestsError | Happens if the server reached the maximum allowed requests in a certain time for the configured account. |
| expiredSDK | The ReadID SDK used is no longer supported. |
| backNavigation | The user closed the identity verification process by hitting the back button. |
Features #
Flows #
The UI SDK supports several different "Flows" that determine how and what you want to capture or read from the document. The following flows exist:
-
VIZOnlyOnePageFlow: Captures a single configured page type. You can "chain" this flow with another VIZOnlyOnePageFlow and/or NFCOnlyFlow in order to achieve the most flexibility w.r.t. UX/UI, such as presenting your own instructions, animations, and/or feedback screens. -
VIZOnlyBothSidesFlow: Captures both sides of a configured document type. -
NFCWithAccessControlFlow: This flow is optimized for reading the document's NFC chip. It will attempt scan the document's MRZ page for access control information, and will also provide the option to enter the access control key manually. Once it has obtained the access control key it will proceed to read the document. This flow may or may not return a usable VIZ capture of the document. Note that if you require the personal number when using this flow, it can result in lower VIZ capture performance, because the flow may have to capture a QR code too. See Flow. shouldRequirePersonalNumber below. -
NFCOnlyFlow: Only read the identity document's NFC chip. This flow can be combined with the VIZOnlyOnePageFlow in order to implement custom business logic in between and around these flows. It is typically used when none of the other flows sufficiently matches your use case. It can also be used without the ReadID UI VIZ SDK entirely. -
NFCWithVIZFlow: Scan the document's MRZ page, then read the chip. Use this flow when you want to acquire a high quality VIZ image and/or features and read the document's NFC chip. -
NFCWithVIZBothSidesFlow: Scan both sides of a document, including the MRZ page, then read the chip. Use this flow when you want to acquire high quality VIZ images of both sides of a document as well as read the document's NFC chip. -
NFCWithVIZFallbackFlow: Scan the access control information, then tries to read the chip. If the chip cannot be read, then this flow will instead scan the other side of the document. That fallback (scanning the other side) happens if the device does notes to skip reading, after the SDK detects an unsupported / no chip, or after an NFC read failure.Fallback does not happen if you have disabled the Skip button or if the user declines to enable NFC. Use this flow when NFC reading is your first priority, but fallback to an optical solution is needed if Confidentiality: Restricted NFC reading fails.
The VIZ SDK will attempt to scan only the requested page or document type(s), as specified via
VIZOnlyOnePageFlow.allowedPageTypesor.allowedDocumentTypesfor the other flows, but we cannot guarantee that the result is of the requested type. The more distinctive features a page has, the higher the chance that the SDK captures the correct page type, and vice versa, but there is always the possibility of a wrong page type. If you rely on the VIZ capture result to be accurate then you must verify the page capture results via some other means. We recommend to always use NFC reading, if possible, and rely on those results instead.
UI/UX #
The Flow that you choose to use also defines the screens that the SDK should present to the user, their order, and the possible transitions between those screens. The following screens exist:
- Document selection screen
- Instruction animation screen
- VIZ capture screen
- Manual input screen
- VIZ confirmation screen
- VIZ result screen
- NFC instruction animation screen
- NFC reading screen
- NFC result screen
All screens except the VIZ capture screen and NFC reading screen are optional:
-
The document selection screen can be shown or disabled by using Flow.
shouldShowDocumentSelectionand is described in section Document selection screen below. -
The instruction animation screen can be disabled by setting
Flow.instructionsPlayCountto0. We recommend leaving the animations enabled unless your app targets expert users. -
The option to enter NFC access control data manually on the manual input screen is only available in
NFCWithAccessControlFlow. That flow is intended to capture an NFC access control key, and is optimized towards that goal at the expense of the quality of the VIZ image and features. -
To disable the VIZ result screen, set
Flow.shouldShowVIZResulttofalse. -
The NFC instruction animation screen can be disabled with
Flow.instructionsPlayCount = 0. We recommend leaving the animations enabled unless your app targets expert users. -
The manual access key input screen will only be shown during the
NFCWithAccessControlFlow, if the SDK detects a wrong NFC access key (extracted from the MRZ). -
You can skip the NFC result screen with
Flow.shouldShowNFCResult = false. It is shown by default. -
You can show the NFC security result section by setting
Flow.nfcResultScreenConfiguration.shouldShowSecurityResult = true. It is skipped by default.
Document selection screen #
ReadID UI VIZ can show a document selection screen that allows users to choose the type of document to scan. Depending on the choice, ReadID UI VIZ can display specific Instruction animations and a VIZ capture-screen screen tailored to that document type.
This screen is disabled by default. Enable it by
setting Flow.shouldShowDocumentSelection to true.
You can configure the document types that the user can choose for the VIZOnlyOnePageFlow
with VIZOnlyOnePageFlow.allowedPageTypes. For other flows with Flow.allowedDocumentTypes.
The following buttons can be shown (with their MRZ format)
- Passport for ICAO compliant passports (2x44 characters)
- Identity card for ICAO TD1 (3x30 characters) and ICAO TD2 (2x36 characters) compliant identity cards
- Driving licence for EU driving licences (1x30 characters) and non-EU compliant driving licences without MRZ
- Visa for ICAO compliant visas (2x36 and 2x44 characters)
- French identity card for ICAO TD1 compliant identity cards (3x30 characters) and CNIS (French identity cards; 2x36 characters)
Instruction animations screens #
ReadID UI provides dynamically generated animations to help the user scan the VIZ of an identity document or read the document's chip. The animations explain how to properly position and align the user's document with their mobile device. Animations are generated based on our knowledge of what a document looks like and where the chip is located. For visas, the SDK displays a static image instead of an animation.
By default the instruction animations will be played indefinitely. Static graphics will always remain on screen until the user presses the "Next" button.
You can disable instruction animations with Flow.instructionsPlayCount = 0. We recommend leaving
the animations enabled unless your app targets expert users who know how to successfully scan a
document.
The number of (re)plays can be changed with Flow.instructionsPlayCount. Setting this to -1
configures the SDK to replay the instruction animations indefinitely, until the user presses the "
Next" button. Setting it to a positive value n plays the animation n times before automatically
navigating to the next screen.
The SDK keeps track of which document types have been scanned successfully before on this device.
Once a user has successfully scanned a certain document type, then by default the SDK will no longer
show instructions for that specific document type. This behavior can be changed by
setting Flow.shouldOnlyShowInstructionsOnFirstUse to false.
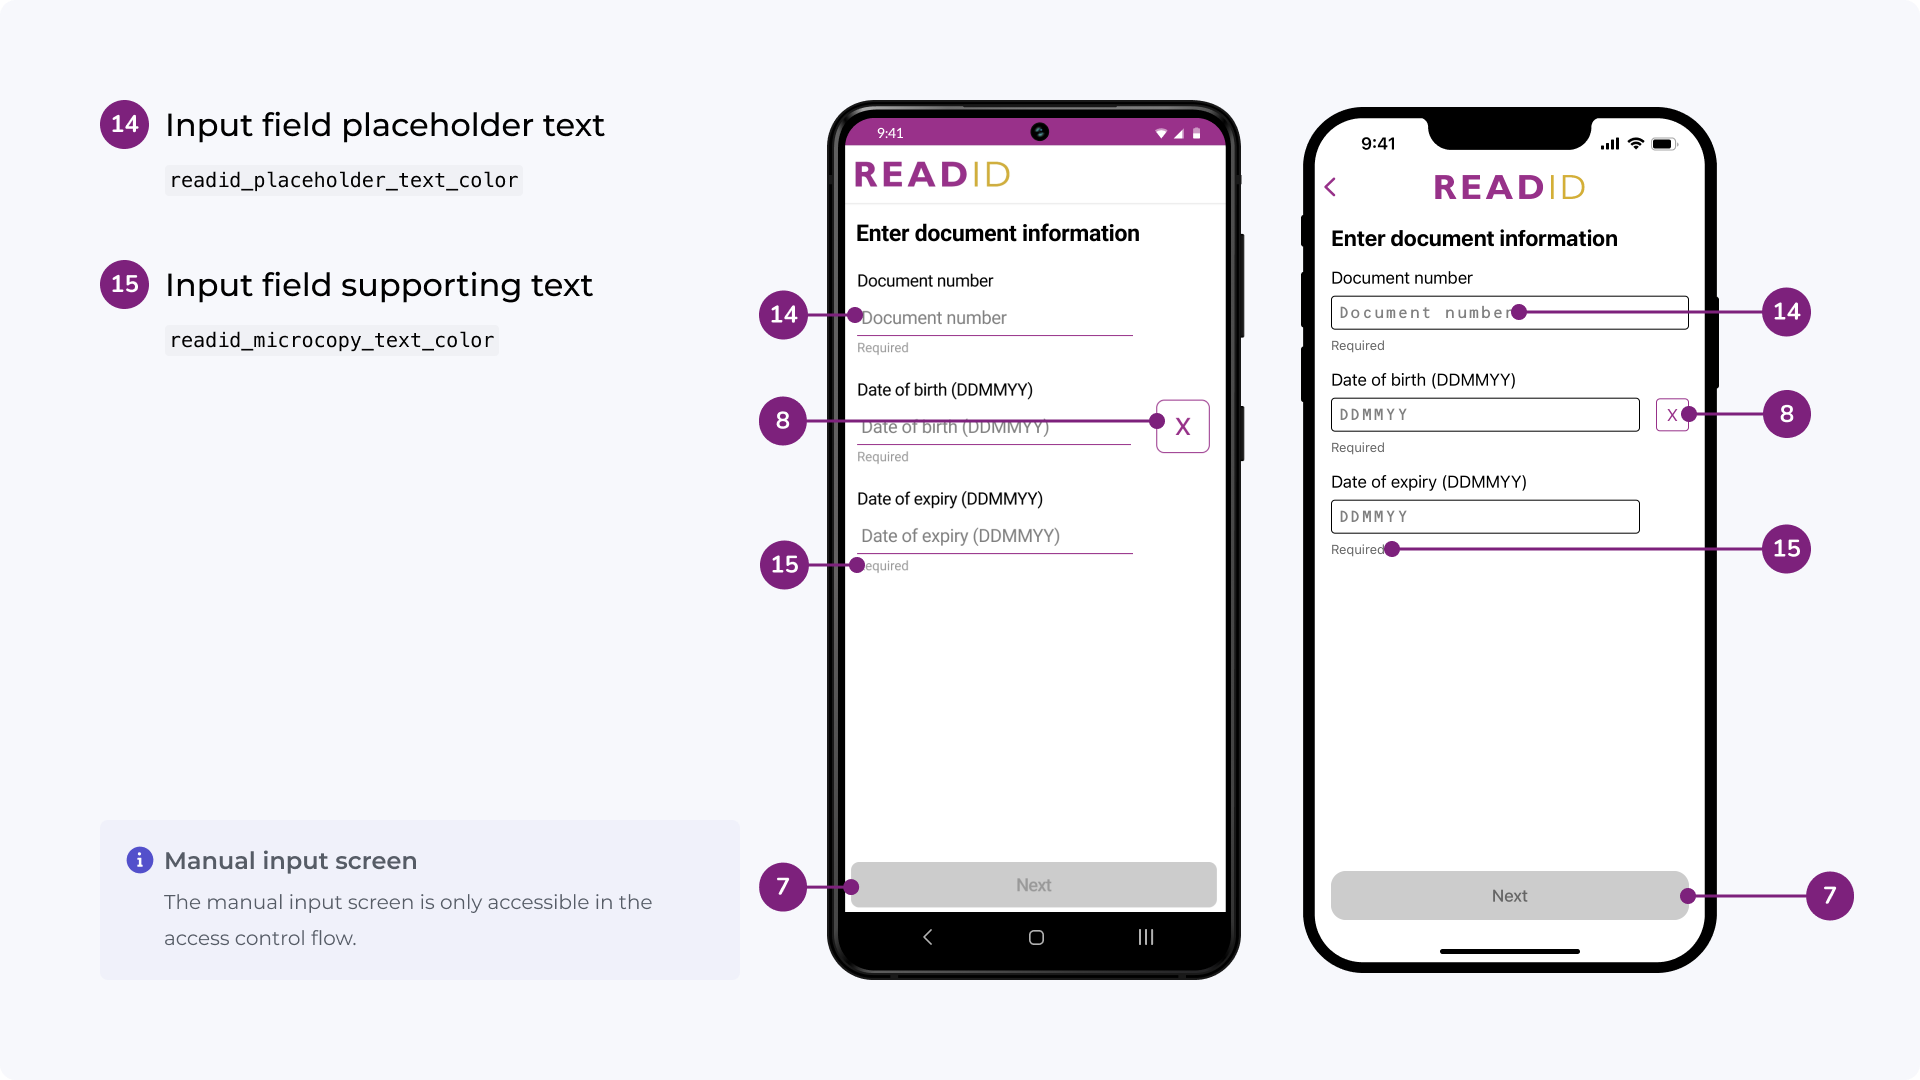
Manual input screen #
The manual input screen provides a fallback for users for when VIZ capture is unable to scan the
MRZ. It allows users to manually input the fields necessary to compute the access key. This screen
is only available in NFCWithAccessControlFlow, for ICAO compliant identity documents and for
electronic driving licences.
VIZ confirmation screen #
The VIZ confirmation screen is shown immediately after the capture of a single page of a document. It provides the user with the option to review the capture, and to repeat the scan of the same page (discarding the result), or to keep the scan and proceed to the next step.
This option can be enable or disabled using Flow.shouldShowVIZConfirmation.
The VIZ confirmation screen can show a set of images, which can be configured with
the VIZConfirmationScreenConfiguration properties. The VIZConfirmationScreenConfiguration can be
retrieved and modified with Flow.vizConfirmationScreenConfiguration.
Note that the VIZ confirmation screen is never shown when manual input was provided.
VIZ result screen #
The VIZ result screen shows the result of the VIZ capture process. You can configure this screen to
show various pieces of information. To do so, first specify which types of information should be
displayed by setting Flow.vizResultDataMode to:
-
VIZResultDataMode.none: Do not show document content data. -
VIZResultDataMode.accessControl: Show only access control information. -
VIZResultDataMode.advancePassengerInformation: Show information that is relevant for airlines and border control. -
VIZResultDataMode.all: Show all available information.
Next to the textual information, you can choose to display the following images from the document:
-
Full MRZ image: a crop of the VIZ image that shows only the MRZ. -
MRZ field crops: a crop of each displayed MRZ field. This is useful in cases where the user should validate the MRZ results. -
Full VIZ images: the full captured image of the document. -
QR code image: a crop of the VIZ image that shows only the QR code.
All images are disabled by default and can be configured with the properties
in Flow.vizResultScreenConfiguration.
In cases where it is desired to not show personal data on a result screen (for example for demo
purposes), it is possible to mask personal data with Flow.shouldMaskPersonalData to true. This
will cause the SDK to replace personal data with * characters and to hide images that contain
personal data. Personal data includes:
-
The document number
-
Optional data (can contain the personal number)
Note that the VIZ result screen is never shown when manual input was provided.
NFC reading screen #
The NFC reading screen displays the progress of the NFC reading process. Prior to and during the
reading process, it shows an instruction carousel with useful tips for the document type to be read.
If the user navigates to this screen, first the instruction carousel is shown. As soon as the user
clicks the 'Start reading' button (iOS) or the phone detects a supported NFC chip (Android), the
screen shows the reading progress. If the reading process fails because of a wrong access key, the
SDK will let the user verify the used access information by showing the manual input screen, or it
will restart the reading process automatically. For the ReadID UI VIZ variant, the manual input
screen is only available in the NFCWithAccessControlFlow flow. If the reading process fails
because of another problem, typically a lost connection, this screen displays an error and lets the
user try again.
If NFC reading finishes with an access control error and manual input is disabled/not supported,
then the SDK returns to the VIZ or MRZ capture screen. If you are not using the ReadID UI VIZ SDK at
all, the SDK returns control with an NFC access control error.
NFC result screen #
The ReadID UI NFC result screen shows chip data and validation results. It is shown by default can
be disabled by setting Flow.shouldShowNFCResult = false.
NFC data result section #
The NFC data result section of the NFC result screen can be configured to show various elements by
setting Flow.nfcResultScreenConfiguration.nfcResultDataMode to:
none: do not show information from the document content.simple: show a subset of information read from the chip, if available:- Given names
- Last name
- Gender (only ICAO compliant documents)
- Nationality (only ICAO compliant documents)
- Date of birth
- Place of birth (only driving licences)
- Personal number (not always available)
- Document code (only ICAO compliant documents)
- Document number
- Issuing country
- Date of expiry
- Driving licence categories (only driving licences)
all: show all information that was read from the chip.
Note: Certain information, such as fingerprints, cannot be shown simply because it cannot be read without a government-issued private key. Only a select group of government related organisations have access to this information.
In addition to the textual information, the result screen can show:
- Verification result (configurable with
shouldShowVerificationResult) - Face image (configurable with
shouldShowFaceImage) - Signature image (configurable with
shouldShowSignatureImage, not always available)
The shown information can be configured via NFCResultScreenConfiguration which can be accessed and
modified with Flow.nfcResultScreenConfiguration.
When you do not want to show personal data other than the face image on the result screen, for
example for demo purposes, you can mask that data by setting Flow.shouldMaskPersonalData = true.
As a result, the SDK will replace personal data with * characters. Fields that are masked are:
- Document number
- Personal number
- Machine Readable Zone (MRZ)
NFC security result section #
The security information section of the NFC result screen shows security-related chip information, including:
- Data version
- Chip features
- Data groups read
- Access control type and results
- Active Authentication (AA) and Chip Authentication (EAC-CA) results
- Passive authentication results
- Document- and Country-signing certificates
- Individual data group hashes and comparison results
The security result section in the NFC result screen can be enabled by
setting Flow.nfcResultScreenConfiguration.shouldShowSecurityResult = true.
Configuration #
This section gives an overview of the configuration options when using the ReadID UI NFC SDK for use with ReadID UI VIZ, for each of the supported flows. For more details and default values read the apidocs delivered with the ReadID UI SDK package.
Be aware that not all identity documents are the same and that ReadID UI NFC will attempt to choose
the best configuration regarding access control (BAC or PACE), speed of NFC reading, and user
guidance (e.g. how to align the user's device with the document) based on information that is passed
from ReadID UI VIZ.
If you do not use ReadID UI VIZ (NFCOnlyFlow only), you'll need to provide an instance
of NFCAccessKey, as it is required for access control. You should also provide a DocumentInfo
object, to give ReadID UI NFC enough information to choose the best NFC configuration.
The SDK will attempt to scan only the requested document type(s), as specified via
Flow.allowedDocumentTypes, but we cannot guarantee that the result is of the requested type. The more distinctive features a page has, the higher the chance that the SDK captures the correct page type, and vice versa, but there is always the possibility of a wrong page type. If you rely on the VIZ capture result to be accurate then you must verify the page capture results via some other means.
If you attempt to capture both drivingLicence and euDrivingLicence (or the front of said
documents), then VIZ capture will always attempt to scan a EU driving licence containing an MRZ
first, to maximize the chances of detecting a document that contains a chip. This may reduce capture
speed when the user attempts to scan a driving license without an MRZ.
Configuration options available for all flows #
Flow.baseURL: Sets the base URL of the target ReadID server or reverse proxy. If you change the base URL, you must override the pinning certificates with the (CA) certificate of the used server.Flow.accessKey: Sets the ReadID access key for server authentication.Flow.oauthToken: Sets the OAuth token for server authentication.Flow.opaqueID: This customer-provided identifier can be used to cross-reference a ReadIDSession to an app session identifier.Flow.shouldUsePinning: Enables/disables SSL pinning. Should only be set to false for debug purposes.Flow.readIDSession: Sets a ReadIDSession. The ReadIDSession is optional and only needs to be set if a previous session should be reused. Note: A ReadIDSession can only be committed once to the server. To prevent a session commit use the following configuration.Flow.preventSessionCommit: Sets whether a session commit should be prevented. This is useful if you want to reuse a ReadIDSession, for example if you want to capture both VIZ images, but also interact with your app between.Flow.instructionsPlayCount: Sets the instruction play count.0disables instructions and<0replays the instruction until the user pressed next.Flow.shouldOnlyShowInstructionsOnFirstUse: Enables/disables only show instructions on first use. By default it is set to true and instructions will only be shown until the user accomplished the related action.Flow.shouldMaskPersonalData: Enables/disables replacing personal data (document number and optional data) with * characters.Flow.shouldAllowScreenshots(Android only): If allow screenshots is enabled, it is possible to make screenshots and screen recordings on the screens of the library, and it is possible to see content in the OS recent apps list.Flow.dateFormat: Sets the date format in the manual input screen.Flow.dateSeparator: Sets the date separator in the manual input screen.Flow.backgroundTimeout: Sets after how many milliseconds (Android) or seconds (iOS) in the background the library returns to the hosting application.Flow.readIDTracker: A ReadIDTracker can be implemented and set to be able to log events inside ReadID UI. Note: This is not stored as a weak reference. So be carefully with implementing the ReadIDTracker to prevent memory leaks.Flow.language: Sets the language to the given language value. Default or if null is applied, the device language will be used, if supported. Fallback is English.
Configuration options available for all VIZ flows #
Flow.shouldShowVIZConfirmation: Sets whether a VIZ confirmation screen should be shown, where the user can check and confirm the VIZ image quality.Flow.vizResultMode: Defines which fields are shown on the VIZ result screen.Flow.shouldShowVIZResult: Defines if to show VIZ result screen.Flow.shouldShowVIZPerformanceResult: Sets whether the VIZ performance result should be shown. If enabled a "Performance" tab is shown on the VIZ result screen. This is useful for debug purposes.Flow.shouldShowMRZFieldImages: Sets show MRZ field images enabled/disabled.Flow.shouldShowMRZText: Sets show MRZ text enabled/disabled.Flow.shouldShowMRZImage: Sets show MRZ image enabled/disabled.Flow.shouldShowVIZImages: Sets show VIZ images enabled/disabled.
Configuration options available for all NFC flows #
Flow.shouldShowInstructionCarousel: Sets whether the instruction carousel should be shown.Flow.nfcResultMode: Sets the NFC result mode. Note: use Flow. shouldShowNFCResult to enable or disable the result screen entirely.Flow.shouldShowNFCResult: Disables NFC result screen. Must be set to false if NFCResultMode.none.Flow.shouldReadImages: Sets whether images should be read from the NFC chip.Flow.shouldShowFaceImage: Sets whether the face image should be shown.Flow.shouldShowVerificationResult: Sets whether the verification result should be shown.Flow.shouldShowSecurityResult: Sets whether the security result should be shown.Flow.allowResumeNFCReading: Attempt to resume NFC reading where it left off after a disconnect. Enabled by default.Flow.allowSkipReadingAfterAttempts: Shows a skip-button on the NFC reading screen after a specified number of attempts.Flow.accessControlOption: Sets the desired access control option to access the document chip.Flow.extendedLengthAPDUPreference: Sets the desire extended length APDU preference. This is a beta feature. Do not use in production.Flow.cscaMasterLists: Not available in Flutter.Flow.applicationLevelEncryptionPins: Array of certificate pins for application-level encryption. Pins can be obtained via the ReadID management portal. Each pin must be specified as a base64-encoded sha256 hash of the SubjectPublicKeyInfo. By default, certificate pinning for application-level encryption is disabled.
VIZOnlyOnePageFlow configurations #
VIZOnlyOnePageFlow.allowedPageTypes: Sets the allowed page types. We recommend to allow only one page type, because allowing multiple page types will reduce the performance.VIZOnlyOnePageFlow.mrzValidation: Sets the MRZ validation. If only access control information for accessing the chip is needed, we recommend to useMRZValidation.accessControl. If also other fields in the MRZ should be correct, useMRZValidation.full, but it could make the capture process slower.VIZOnlyOnePageFlow.fastCaptureMode: Enables or disables fast capture mode. If enabled, VIZ capture will focus (only) on scanning the MRZ as fast and accurate as possible. If disabled, VIZ capture will focus on producing a high quality image capture. Note that fast capture mode can only be enabled iffaceImageFeatureRequirementandqrCodeFeatureRequirementare both set tonotRequired.VIZOnlyOnePageFlow.manualCaptureAllowedAfterTimeout: Sets after how many milliseconds a manual capture button should be shown. A negative value will never show the button.VIZOnlyOnePageFlow.mrzFeatureRequirement: Sets the MRZ feature requirement.VIZOnlyOnePageFlow.faceImageFeatureRequirement: Sets the face image feature requirement.VIZOnlyOnePageFlow.shouldRequireSharpImage: Sets whether a sharp image is required.VIZOnlyOnePageFlow.shouldRequireNoGlareOnDocument: Sets whether no glare on document is required.VIZOnlyOnePageFlow.shouldRequireNoFingerOnDocument: Sets whether no finger on document is required.VIZOnlyOnePageFlow.shouldAllowLoweringQualityRequirements: Sets whether it is allowed to lower the above 3 quality requirements in time.VIZOnlyOnePageFlow.qrCodeFeatureRequirement: Sets the QR code feature requirement.
The SDK will attempt to scan only the requested page type(s), as specified via
VIZOnlyOnePageFlow.allowedPageTypes, but we cannot guarantee that the result is of the requested type. The more distinctive features a page has, the higher the chance that the SDK captures the correct page type, and vice versa, but there is always the possibility of a wrong page type. If you rely on the VIZ capture result to be accurate then you must verify the page capture results via some other means. We recommend to always use NFC reading, if possible, and rely on those results instead.
VIZOnlyBothSidesFlow configurations #
VIZOnlyBothSidesFlow.allowedDocumentTypes: Sets the allowed document types. We recommend to allow only one document type, because allowing multiple document types will reduce the performance.VIZOnlyBothSidesFlow.shouldShowDocumentSelection: Sets whether the document selection screen should be shown.VIZOnlyBothSidesFlow.shouldRequirePersonalNumber: Sets whether to retrieve the personal number from the MRZ or from a QR code on the document. The latter occurs on Dutch passports and ID cards from late 2021 or newer. If you enable this option, the SDK will automatically detect Dutch documents with a BSN in the QR, and will require a scan of that QR. Note that this process may fail due to, for example, OCR mistakes that prevent the SDK from detecting that the document is Dutch.
Obtaining the personal number from the scanned MRZ or QR code is unreliable due to the lack of mechanisms to protect the integrity and authenticity of data, unlike for data read from the chip.
The SDK will attempt to scan only the requested page types, as specified via
VIZOnlyBothSidesFlow.allowedDocumentTypes, but we cannot guarantee that the result is of the requested type. The more distinctive features a page has, the higher the chance that the SDK captures the correct page type, and vice versa, but there is always the possibility of a wrong page type. If you rely on the VIZ capture result to be accurate then you must verify the page capture results via some other means. We recommend to always use NFC reading, if possible, and rely on those results instead.
NFCOnlyFlow configuration options #
NFCOnlyFlow supports all common configuration options, plus the following:
NFCOnlyFlow.preventChipSupportDialog: Sets whether chip support warning
dialogs should be prevented. This is useful when the chip support was already
checked by the app before starting the NFC flow and the app allows to try to read the NFC chip
anyway.
When combining the VIZOnlyOnePageFlow with this flow, you typically need to pass the
existing readIDSession to the NFCOnlyFlow so that it can use the already obtained NFC access key
and other information. See the Usage section or the sample code for more information.
NFCWithAccessControlFlow and NFCWithVIZFallbackFlow configuration options #
NFCWithAccessControlFlow and NFCWithVIZFallbackFlow support all common configuration options,
plus the following:
Flow.shouldShowDocumentSelection: Sets whether the document selection screen should be shown.Flow.shouldShowVIZConfirmation: Sets show VIZ confirmation screen enabled /disabled.Flow.allowedDocumentTypes: Sets the list of allowed document types that can be captured. Note that if the user doesn't capture their document, but enters the access control manually, then this list does not apply.Flow.vizResultMode: Configures what should be shown on the VIZ results screen.Flow.shouldShowVIZPerformanceResult: Sets whether the VIZ performance result should should be shown or not.Flow.shouldShowMRZFieldImages: Sets show MRZ field images enabled/disabled.Flow.shouldShowMRZText: Sets show MRZ text enabled/disabled.Flow.shouldShowMRZImage: Sets show MRZ image enabled/disabled.Flow.shouldShowVIZImages: Sets show VIZ images enabled/disabled.Flow.shouldShowQRCodeImage: Sets show QR code image enabled/disabled.Flow.shouldRequirePersonalNumber: Sets whether to retrieve the personal number from the MRZ or from a QR code on the document. The latter occurs on Dutch passports and ID cards from late 2021 or newer. If you enable this option, the SDK will automatically detect Dutch documents with a BSN in the QR, and will require a scan of that QR. Note that this may cause the SDK to ask the user to scan the back of their passport, after scanning the front but before NFC reading starts, as that is where the QR code resides. Also note that this process may fail due to, for example, OCR mistakes that prevent the SDK from detecting that the document is Dutch.
Obtaining the personal number from the scanned MRZ or QR code is unreliable due to the lack of mechanisms to protect the integrity and authenticity of data, unlike for data read from the chip.
The SDK will attempt to scan only the requested page type(s), as specified via
Flow.allowedDocumentTypes, but we cannot guarantee that the result is of the requested type. The more distinctive features a page has, the higher the chance that the SDK captures the correct page type, and vice versa, but there is always the possibility of a wrong page type. If you rely on the VIZ capture result to be accurate then you must verify the page capture results via some other means.
NFCWithVIZFlow and NFCWithVIZBothSidesFlow configurations #
NFCWithVIZFlow and NFCWithVIZBothSidesFlow support all options from NFCWithAccessControlFlow
flow, plus the following:
NFCWithVIZFlow.shouldCommitSessionWithoutNFC: Sets whether a session should also be committed to the server if NFC reading did not succeeded. This can happen if the user skipped NFC reading or if the SDK detected a document without chip.
NFC chip support #
ReadID UI VIZ produces a VIZResult which contains, among other results, the likelihood of whether
or not the NFC chip of the scanned document is supported. We actively maintain a database that is
used as the basis for this information, in an attempt to make this as accurate as possible. However,
the assessment may be incorrect, and is provided as-is.
The NFC chip support status can be checked with the following code:
Android, where the Activity result is received:
ReadIDUI.getResult(VIZResult::class.java, data)?.let { vizResult ->
  val nfcChipSupport = vizResult.nfcChipSupport
}
iOS, once you have obtained a vizResult from the ReadIDUI.identify() call:
let nfcChipSupport = vizResult.nfcChipSupport
The NFC chip support will always be one of the following values:
supported: The NFC chip of the document is supported by ReadID.unsupported: The chip of the document is not supported by ReadID.noNFCChip: The document does not have a NFC chip.unknown: The NFC chip support is unknown. This can be the case for very old and for very recently issued documents.
Please be aware that the NFC chip support may be sub-optimal or even wrong. For example, if a state suddenly starts issuing identity documents with supported chips, where that was not the case previously. Or a document that normally has a chip may be issued without a chip in a different location, as temporary document. We actively maintain our knowledge regarding chip support to keep it as accurate as possible. Therefore, please make sure to update to the latest release as soon as possible. The old version of the SDK will have outdated information.
Document and device NFC location #
ReadID UI VIZ produces a VIZResult which contains, among other results, the location of the NFC antenna on the document and the device. The latter is only available on Android. For iOS, the device NFC antenna is always in the top middle of the device.
The result can be used to implement custom instruction animations. We actively maintain a database that is used as the basis for the document and device NFC location in an attempt to make these locations as accurate as possible. However, the assessment may be incorrect, and is provided as-is.
You can retrieve the document and the device antenna location using VIZResult.documentNFCLocation and VIZResult.deviceNFCLocation.
Please be aware that the document and device NFC location may be sub-optimal. It can even be outdated or wrong, for example when a state suddenly starts issuing identity documents with a different NFC chip location, or when a certain device manufacturer brings out a new device with a different NFC reader location than previous models. We strive to keep our location database as up-to-date as possible.
Styling #
Android
The ReadID UI SDKs make use of different Android resources like fonts, colors, drawables, dimensions and layouts. To adapt the style of the ReadID UI SDKs to the style of your app it is possible to override these resources.
Fonts
Fonts can be changed by overriding the used font resources.
The fonts are located in /res/font and have the following names and functions:
readid_text_font- By default Roboto regular.
- Used for normal text, labels and values.
readid_title_font- By default Roboto medium.
- Used for screen titles.
readid_button_font- By default Roboto medium.
- Used for primary and secondary buttons.
readid_text_button_font- By default Roboto medium.
- Used for the "Skip reading" button on the NFC read screen.
readid_ocr_b- By default OCR B.
- Used as MRZ placeholder while VIZ scanning and on the result screens for MRZ values.
- Note: should not be overridden, otherwise shown MRZs will look unformatted and comparison from MRZ value and photo crop will be more difficult for the user.
Drawables
The header logo can be changed by overriding:
/res/drawable/readid_header_image.xml
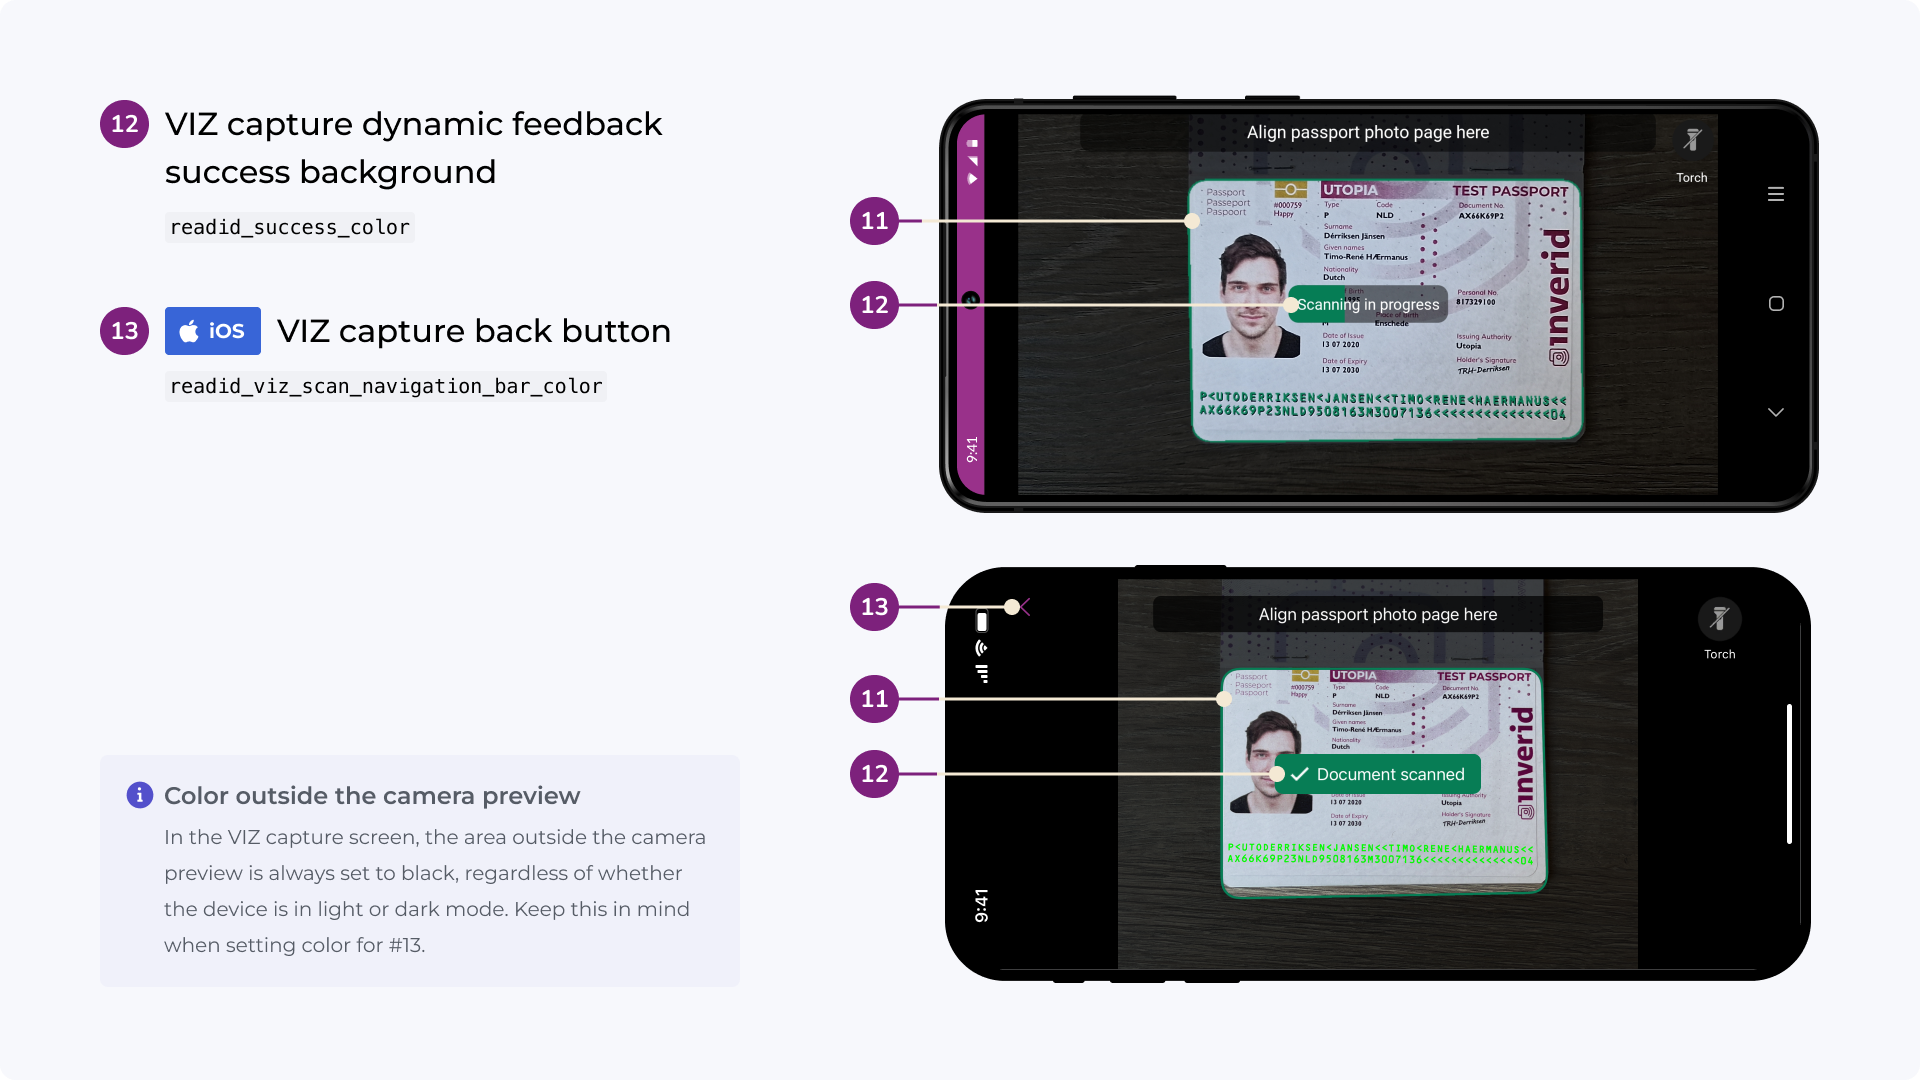
The VIZ back button image can be changed by overriding:
<!-- Either override each drawable -->
res/drawable/readid_viz_back.xml
res/drawable/readid_viz_back_pressed.xml
<!-- or only the selector drawable and use your own image resources -->
res/drawable/readid_viz_back_selector.xml
Note: the original back button images contain a visible content of 36x36dp with 6dp horizontal padding, 4dp top padding and 8dp bottom padding to archive proper alignment a click area of 48x48dp.
The VIZ torch button image can be changed by overriding:
<!-- Either override each drawable -->
res/drawable/readid_torch_off.xml
res/drawable/readid_torch_off_pressed.xml
res/drawable/readid_torch_on.xml
res/drawable/readid_torch_on_pressed.xml
<!-- or only the selector drawable and use your own image resources -->
res/drawable/readid_torch_selector.xml
The VIZ manual input button image can be changed by overriding:
<!-- Either override each drawable -->
res/drawable/readid_manual_input.xml
res/drawable/readid_manual_input_pressed.xml
<!-- or only the selector drawable and use your own image resources -->
res/drawable/readid_manual_input_selector.xml
Dimensions
Margin:
<!-- will change the default screen padding and margins between
    views -->
<dimen name="readid_margin">16dp</dimen>
<!-- will change the vertical margin between values on the result screens -->
<dimen name="readid_margin_small">8dp</dimen>
Header:
<!-- will change the header height -->
<dimen name="readid_header_height">60dp</dimen>
<!-- will change the header logo width -->
<dimen name="readid_header_logo_width">
    @dimen/readid_wrap_content
</dimen>
<!-- will change the header logo height -->
<dimen name="readid_header_logo_height">
    @dimen/readid_match_parent
</dimen>
Text:
<!-- will change the default text size -->
<dimen name="readid_text_size">17sp</dimen>
<!-- will change the title text size -->
<dimen name="readid_text_size_title">22sp</dimen>
<!-- will change the section header text size (result screen
section titles) -->
<dimen name="readid_text_size_section_header">18sp</dimen>
<!-- will change the icon button text size -->
<dimen name="readid_button_icon_text_size">12sp</dimen>
<!-- will change the manual input error message text size -->
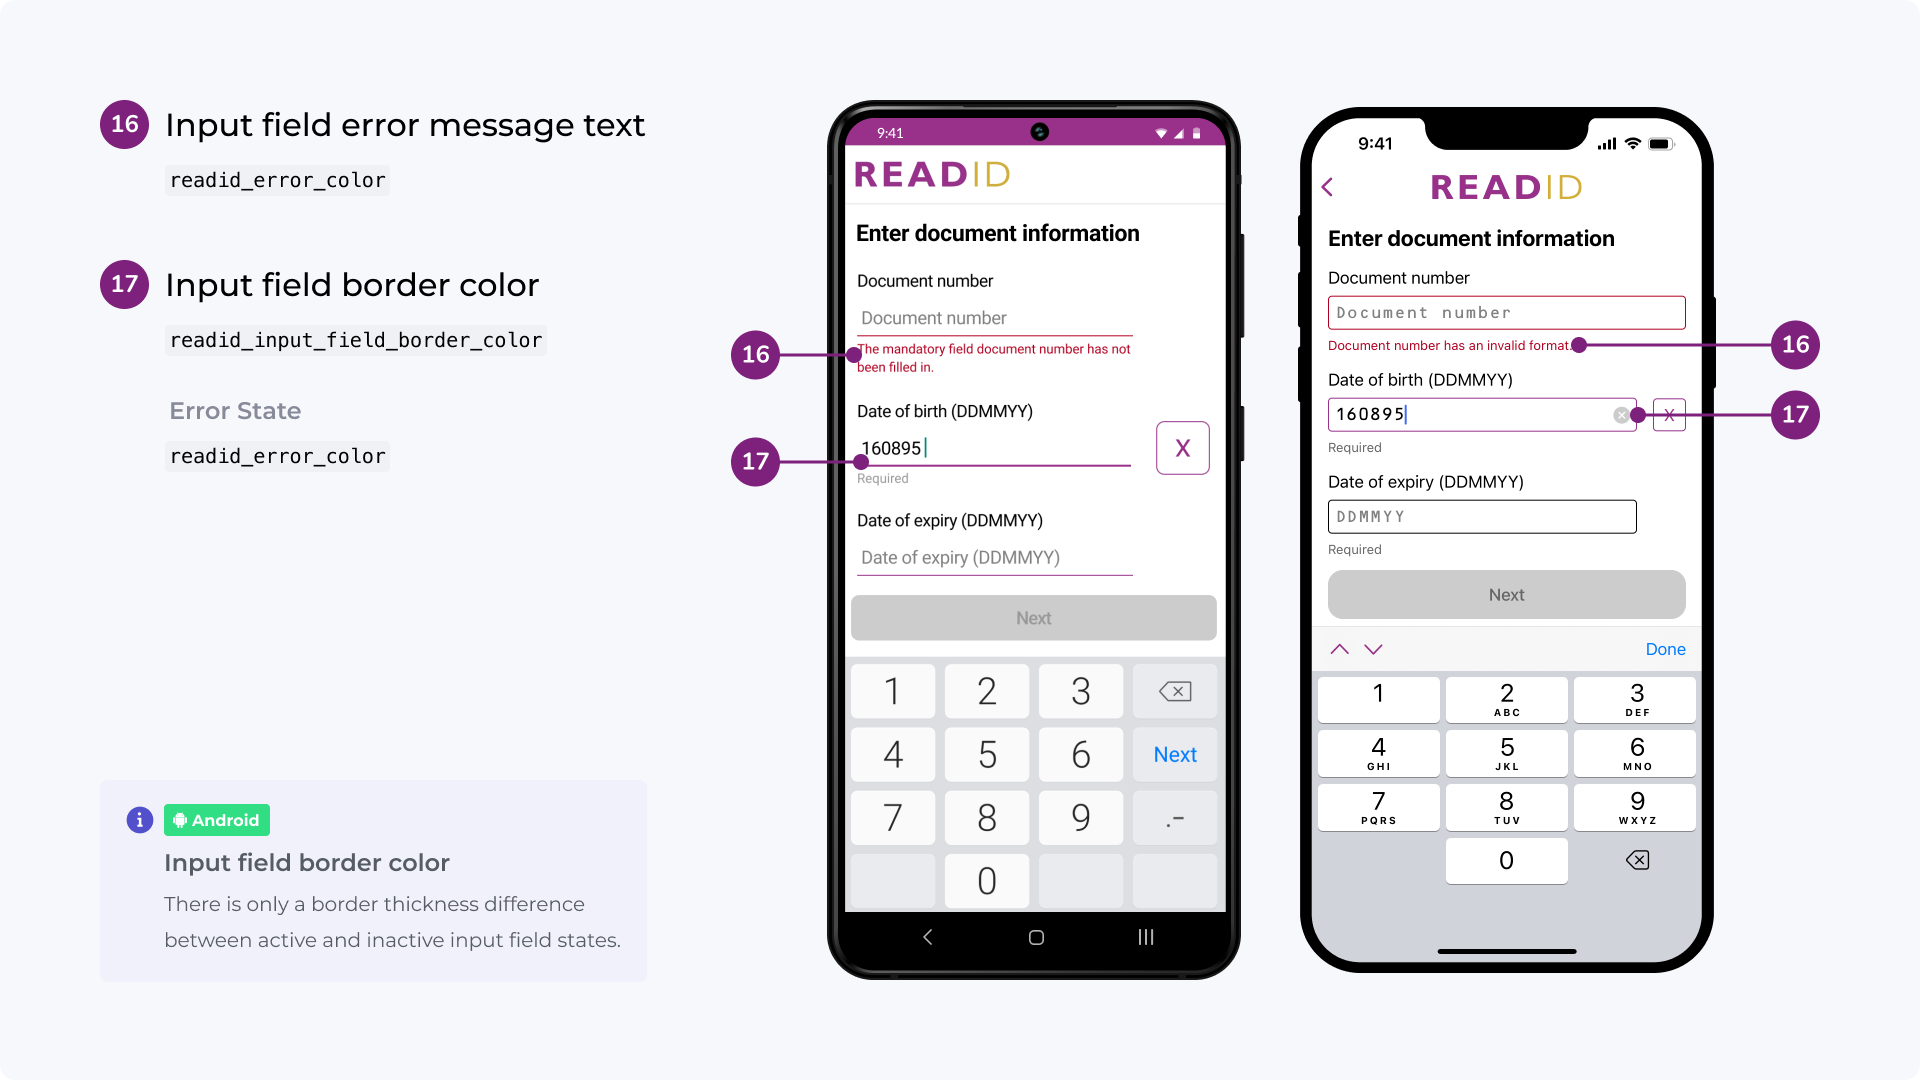
<dimen name="readid_input_field_error_text_size">12sp</dimen>
Primary/secondary button:
<!-- will change the primary and secondary buttons -->
<dimen name="readid_button_height">48dp</dimen>
<dimen name="readid_button_corner_radius">2dp</dimen>
<dimen name="readid_button_text_size">17sp</dimen>
<dimen name="readid_button_stroke_width">1dp</dimen>
<!-- will enable/disable all caps for the primary and
    secondary buttons -->
<bool name="readid_button_all_caps">false</bool>
Icon buttons:
<!-- will change the icon button size -->
<dimen name="readid_button_icon_size">48dp</dimen>
Manual input screen:
<!-- Manual input X button size -->
<dimen name="readid_x_button_size">48dp</dimen>
VIZ wireframe:
<!-- will change the MRZ wireframe stroke width and
    corner radius -->
<dimen name="readid_wireframe_stroke_width">3dp</dimen>
<dimen name="readid_wireframe_corner_radius">24dp</dimen>
Face image:
<!-- will change the face image width on the result screens
    (it will keep the aspect ratio) -->
<dimen name="readid_face_image_width">150dp</dimen>
QR code image:
<!-- will change the QR code image width on the result screens
    (it will keep the aspect ratio) -->
<dimen name="readid_qr_code_image_width">50dp</dimen>
Document image:
<!-- will change the document and MRZ image width on the result
    screens (it will keep the aspect ratio) -->
<dimen name="readid_document_image_width">
    @dimen/readid_match_parent
</dimen>
Signature image:
<dimen name="readid_signature_image_width">150dp</dimen>
Instruction carousel:
<dimen name="readid_carousel_progress_indicator_size">16dp</dimen>
Layouts
The header bar can be changed by overriding:
/res/layout/readid_header.xml
For example:
<RelativeLayout xmlns:android="http://schemas.android.com/apk/res/android"
    android:layout_width="match_parent"
    android:layout_height="@dimen/readid_header_height"
    android:importantForAccessibility="noHideDescendants">

    <ImageView
        android:id="@+id/ivLogo"
        android:layout_width="@dimen/readid_header_logo_width"
        android:layout_height="@dimen/readid_header_logo_height"
        android:layout_alignParentStart="true"
        android:layout_centerVertical="true"
        android:layout_marginStart="@dimen/readid_margin"
        android:layout_marginTop="@dimen/readid_margin_small"
        android:layout_marginEnd="@dimen/readid_margin"
        android:layout_marginBottom="@dimen/readid_margin_small"
        android:adjustViewBounds="true"
        android:scaleType="fitCenter"
        android:src="@drawable/readid_header_image"/>

    <View
        android:layout_width="match_parent"
        android:layout_height="1dp"
        android:layout_alignParentBottom="true"
        android:background="?android:attr/listDivider"/>
</RelativeLayout>
It is possible to add a view with android:id="@+id/back", which will get the same functionality as the Android hardware back button, if it exists.
The progress bar can be changed by overriding:
/res/layout/readid_progress_bar.xml
For example (do not change view type and android:id):
<ProgressBar xmlns:android="http://schemas.android.com/apk/res/android"
  xmlns:app="http://schemas.android.com/apk/res-auto"
  android:id="@+id/pbWaitProgress"
  style="?android:attr/progressBarStyle"
  android:layout_width="wrap_content"
  android:layout_height="wrap_content"
  android:layout_centerInParent="true"
  android:indeterminate="true"
  android:indeterminateTint="@color/readid_loading_color"
  android:saveEnabled="false"
  app:layout_constraintBottom_toBottomOf="parent"
  app:layout_constraintEnd_toEndOf="parent"
  app:layout_constraintStart_toStartOf="parent"
  app:layout_constraintTop_toTopOf="parent" />
Alert dialog style
The in the SDK shown alert dialogs are using a custom theme called readid_dialog_theme.
This theme can be overridden by adding a style/theme with the same name to your app.
<style name="readid_dialog_theme" parent="your or Android alert dialog theme"/>
Alternative it is also possible to only override the following dialog colors:
<color name="readid_dialog_button_text_color">#973189</color>
<color name="readid_dialog_text_color">#333333</color>
<color name="readid_dialog_background_color">#F2F2F2</color>
Strings and languages
The SDK provides five languages by default:
- English (UK)
- Dutch
- Spanish
- French
- German
All text in the SDK can be overridden in the app by adding a new strings.xml file to the app's values-<LOCALE> folder.
When customising strings, keep in mind that accessibility settings such as large fonts can have a significant effect on the layout of strings, especially when using large words.
The default set of strings can be found in the String resources.zip on https://docs.readid.com/.
If you intend to use a specific language, regardless of the device language, you can force the SDK to use that language with flow.language.
Examples:
- Use
flow.language = "es"to enforce the usage ofres/values-es/strings.xml - Use
flow.language = "es-AR"to enforce the usage ofres/values-es-rAR/strings.xml(Note: "es-AR" is by default not supported)
iOS
The ReadID UI framework makes use of different resources like colors and images. To adapt the style of the ReadID UI SDK to the style of your app it is possible to override these resources by providing a custom bundle to the Flow property UIResources.
For example, If you need custom colors and/or a custom titleImage, set them in your application's Assets.xcassets.
Then set the bundle in which your .xcassets reside as a custom bundle in ReadID UI.
Below is an example for the common use case where the .xcassets of an app are part of the main bundle:
// Set up your styling
UIResources uiResources = UIResources();
uiResources.customBundleIdentifier = 'com.readid.readidExample.flutter';

// Apply it to a flow
flow.uiResources = uiResources;
See UIResources in the API documentation for details about the configurable parameters.
Header image
When a readid_header_image image is set in the .xcassets and the bundle is set as above, the SDK will use this image as the titleView for the navigation item of all viewControllers. Make sure the size is correct, otherwise it will be off-center.
Fonts
You can change the font(s) used for various UI elements via UIResources. For example, to set the font for buttons:
UIFont buttonFont = UIFont();
buttonFont.name = 'MarkerFelt-Thin';
buttonFont.size = 24;
UIResources uiResources = UIResources();
uiResources.buttonFont = buttonFont;

flow.uiResources = uiResources;
Images
Specific images can be customised statically in the same way as you would change colors. The following images can be customised:
/*
The SDK will use this image as the titleView for the navigation item of all viewControllers. Make sure the size is correct, otherwise it will be off-center.
*/
readid_header_image

/*
Icon on the viz capture screen for when torch is toggled on.
Image has a 1:1 ratio
*/
readid_torch_on

/*
Icon on the viz capture screen for when torch is toggled on. (Pressed state)
Image has a 1:1 ratio
*/
readid_torch_on_pressed

/*
Icon on the viz capture screen for when torch is toggled off.
Image has a 1:1 ratio
*/
readid_torch_off

/*
Icon on the viz capture screen for when torch is toggled off. (Pressed state)
Image has a 1:1 ratio
*/
readid_torch_off_pressed

/*
Icon on the viz capture screen for manual input.
Image has a 1:1 ratio
*/
readid_manual_input

/*
Icon on the viz capture screen for manual input. (Pressed state)
Image has a 1:1 ratio
*/
readid_manual_input_pressed
Strings and languages
The SDK provides five languages by default:
- English (UK)
en - Dutch
nl - Spanish
es - French
fr - German
de
All text in the SDK can be overridden in the app by adding them to the app's Localizable.strings. Set Flow.uiResources.customBundle to the bundle in which your Localizable.strings files resides. Example:
UIResources uiResources = UIResources();
uiResources.customStringTableName = 'SomeOtherName';

flow.uiResources = uiResources;
When customising strings, keep in mind that accessibility settings such as large fonts can have a significant effect on the layout of strings, especially when using large words.
The default set of strings can be found in the String resources.zip on https://docs.readid.com/.
If you intend to use a specific language, regardless of the device language, you can force the SDK to use that language with flow.language.
Examples:
- Use
flow.language = "es"to enforce Spanish language - Use
flow.language = "es-AR"to enforce Spanish as used in Argentina (Note: "es-AR" is by default not supported)
Colors #
System colors
SDK colors


Android color customisation
Colors can be statically overriden in the .xml files in the resources folder.
All below listed resources can be changed for light and dark mode:
- The light color resources are located in
/res/values - The dark color resources are located in
/res/values-night
Dark mode can be disabled by adding AppCompatDelegate.setDefaultNightMode(AppCompatDelegate.MODE_NIGHT_NO) to your app.
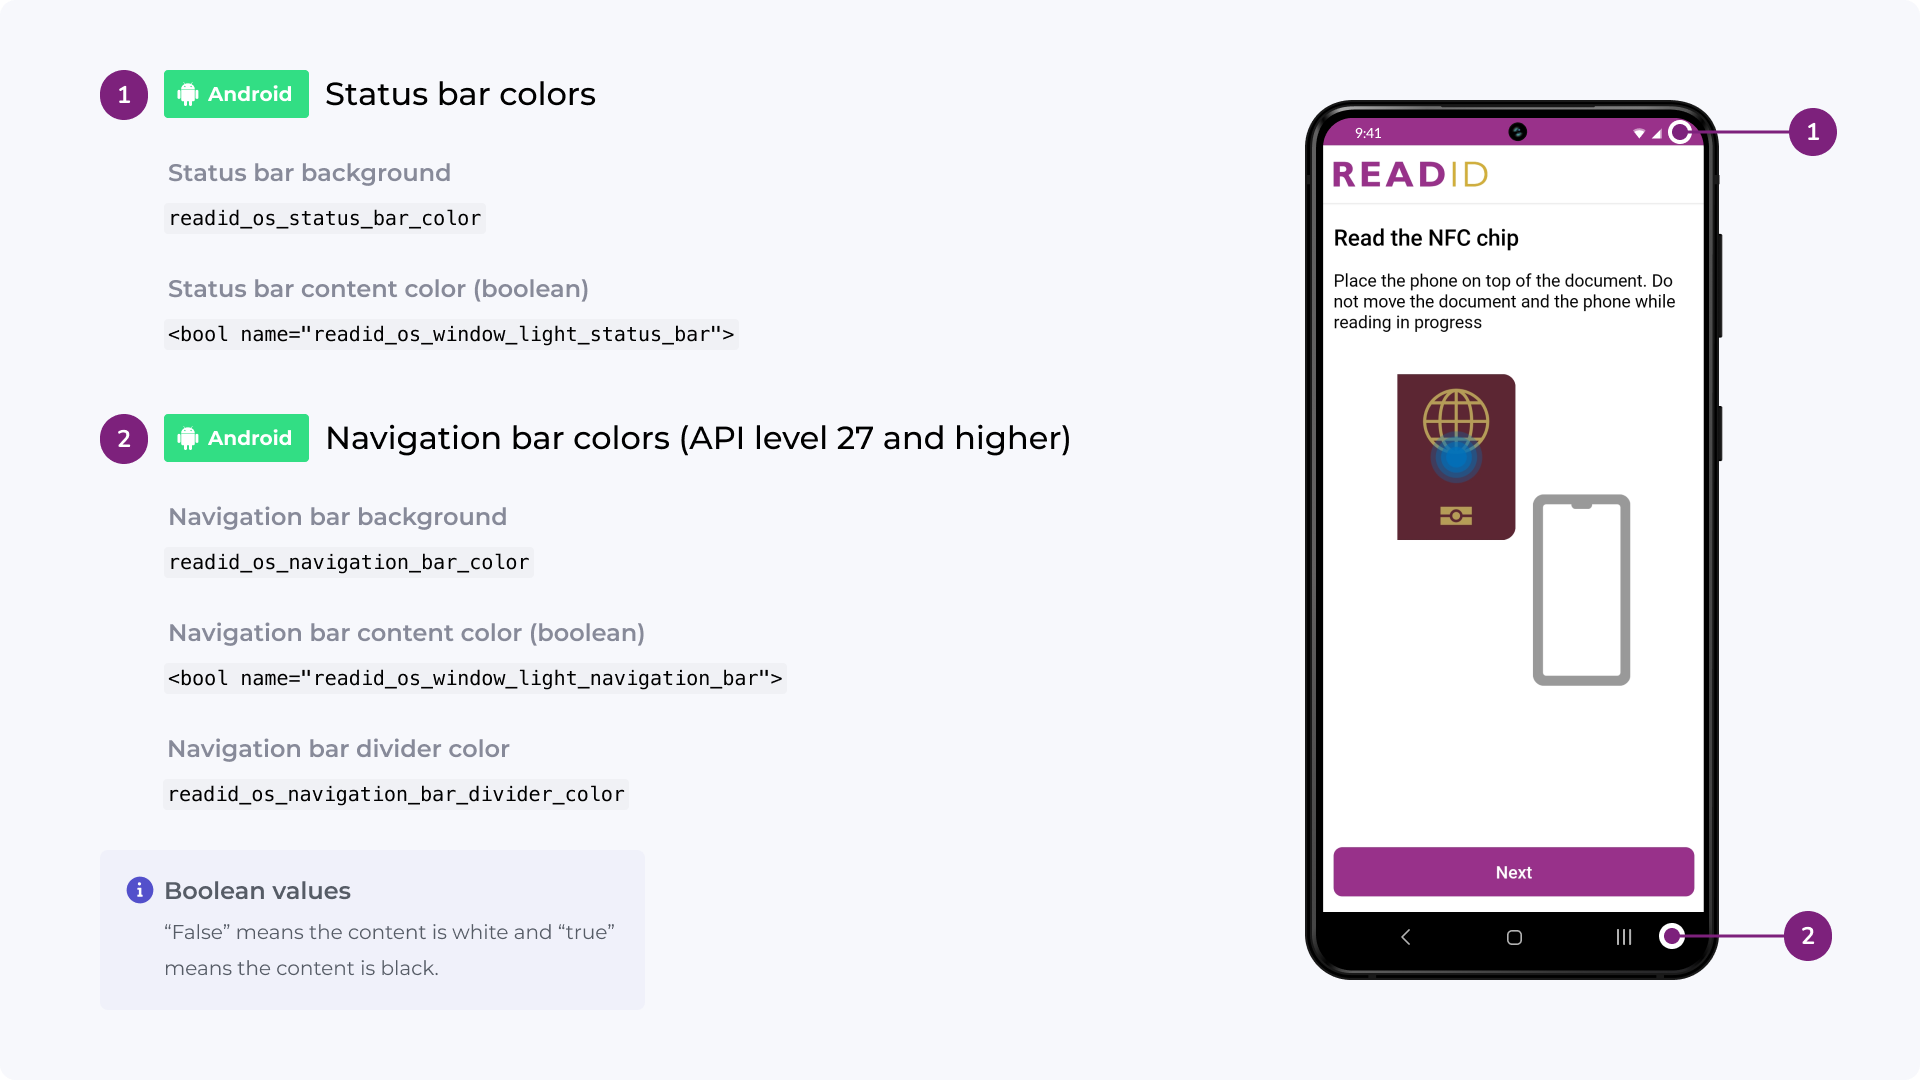
OS system bars:
<!-- will change the status bar color -->
<color name="readid_os_status_bar_color">#973189</color>
<!-- will tell the OS whether a light status bar color is used and
    will give the text more contrast -->
<bool name="readid_os_window_light_status_bar">false</bool>
<!-- will change the OS navigation bar color -->
<color name="readid_os_navigation_bar_color">#000000</color>
<!-- will tell the OS whether a light navigation bar color is used
    and will give the symbols more contrast (has no effect on
    Android API level < 27) -->
<bool name="readid_os_window_light_navigation_bar">false</bool>
<!-- will change the OS navigation bar divider color (has no effect
    on Android API level < 27) -->
<color name="readid_os_navigation_bar_divider_color">#00000000</color>
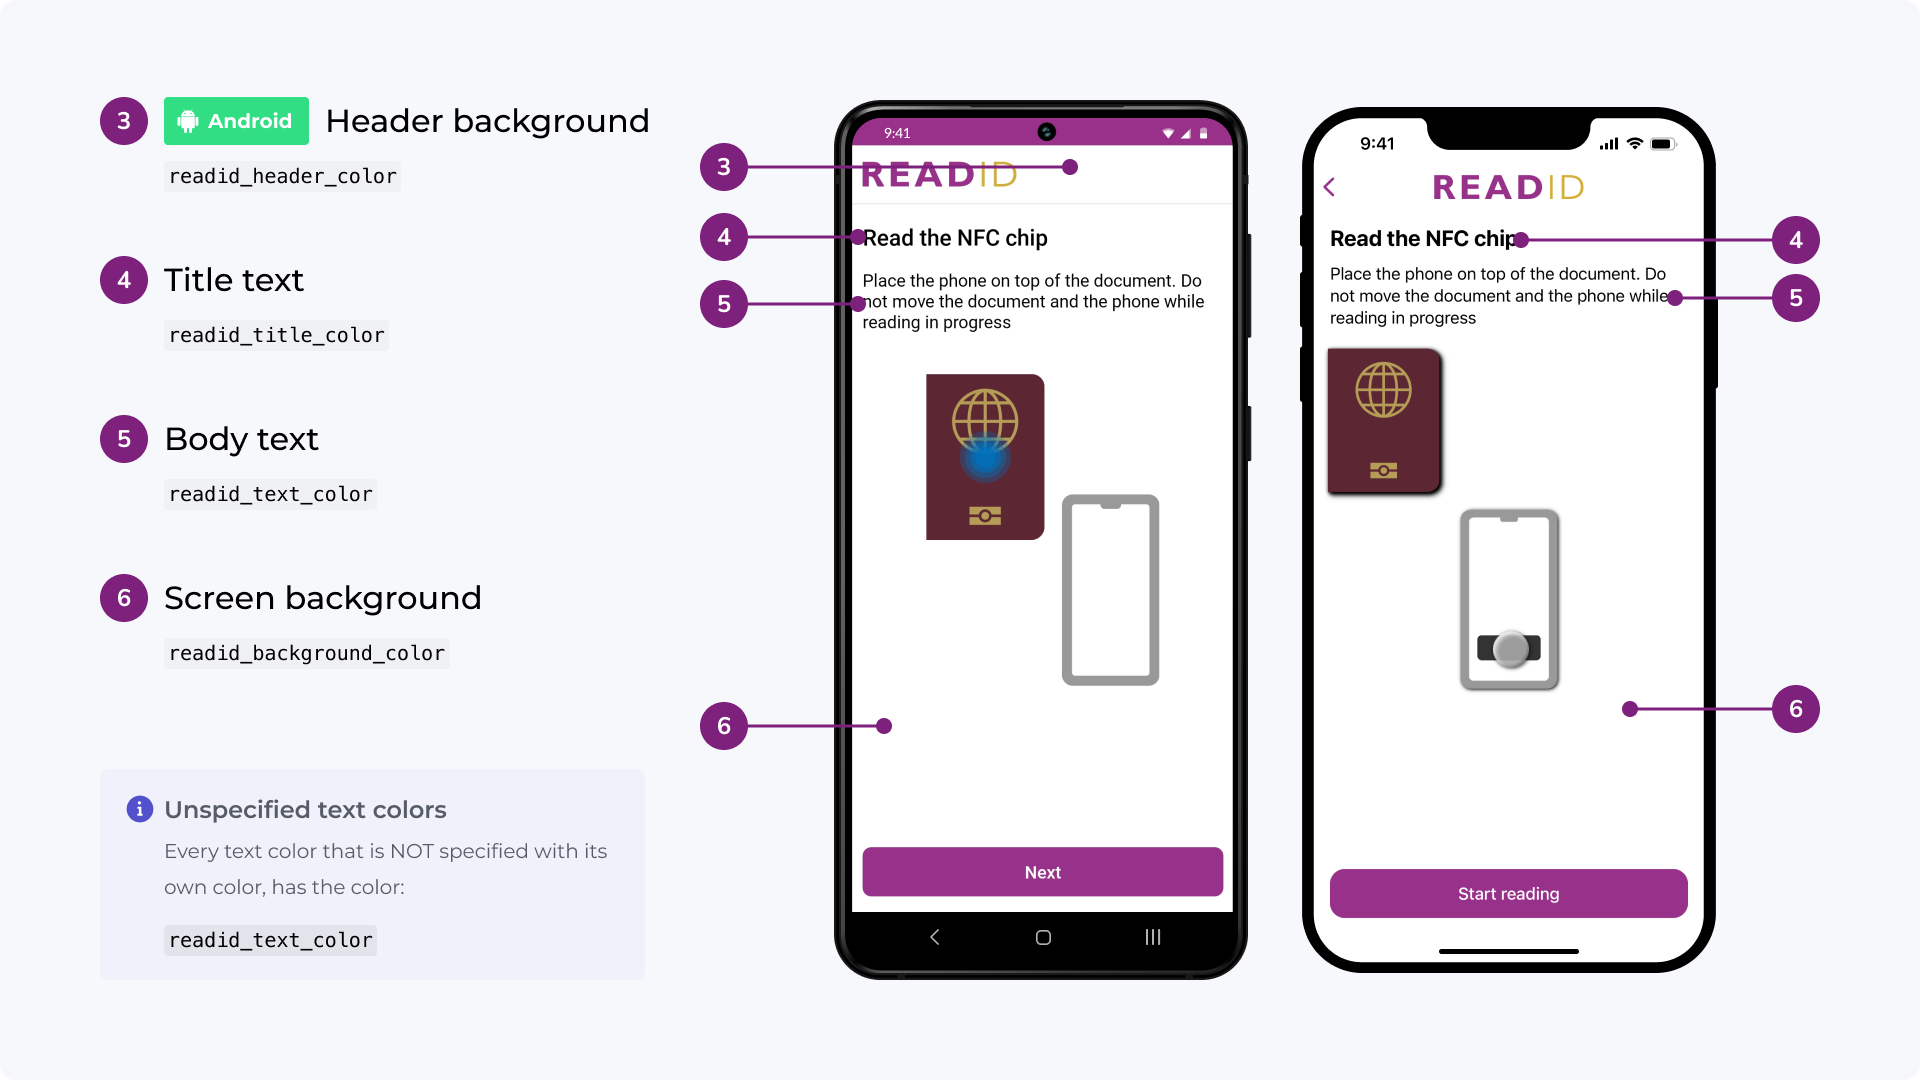
Background and header colors:
<color name="readid_background_color">#FFFFFF</color>
<color name="readid_header_color">#FFFFFF</color>
Text:
<!-- will change the title text color -->
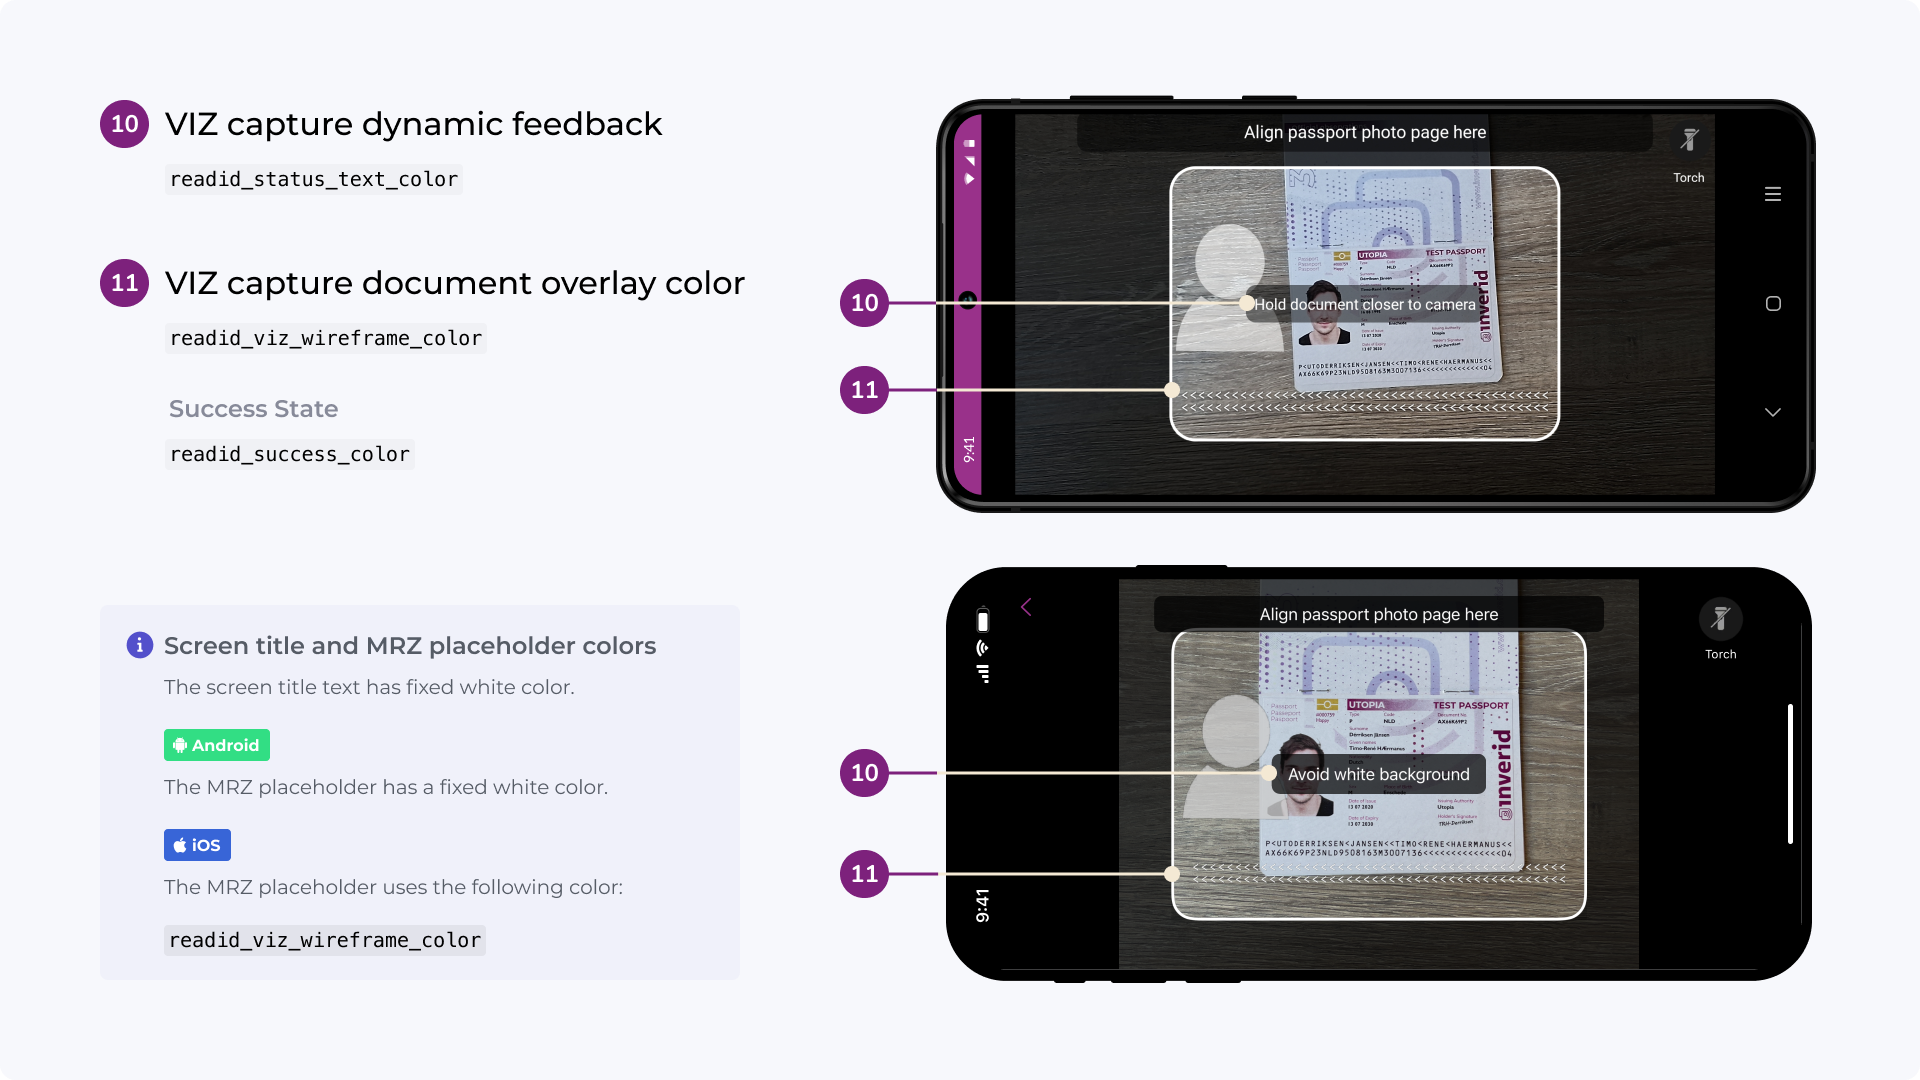
<color name="readid_title_color">#000000</color>
<!-- will change the default text color -->
<color name="readid_text_color">#000000</color>
<!-- will change the placeholder text color (manual input screen) -->
<color name="readid_placeholder_text_color">#808080</color>
<!-- will change the microcopy text color (manual input screen) -->
<color name="readid_microcopy_text_color">#666666</color>
<!-- will change the section header text color (result screens) -->
<color name="readid_section_header_text_color">
@color/readid_text_color
</color>
<!-- will change the section header background color (result screens) -->
<color name="readid_section_header_background_color">#EBEBEB</color>
Loading views:
<!-- will change the spinner and progress bar color -->
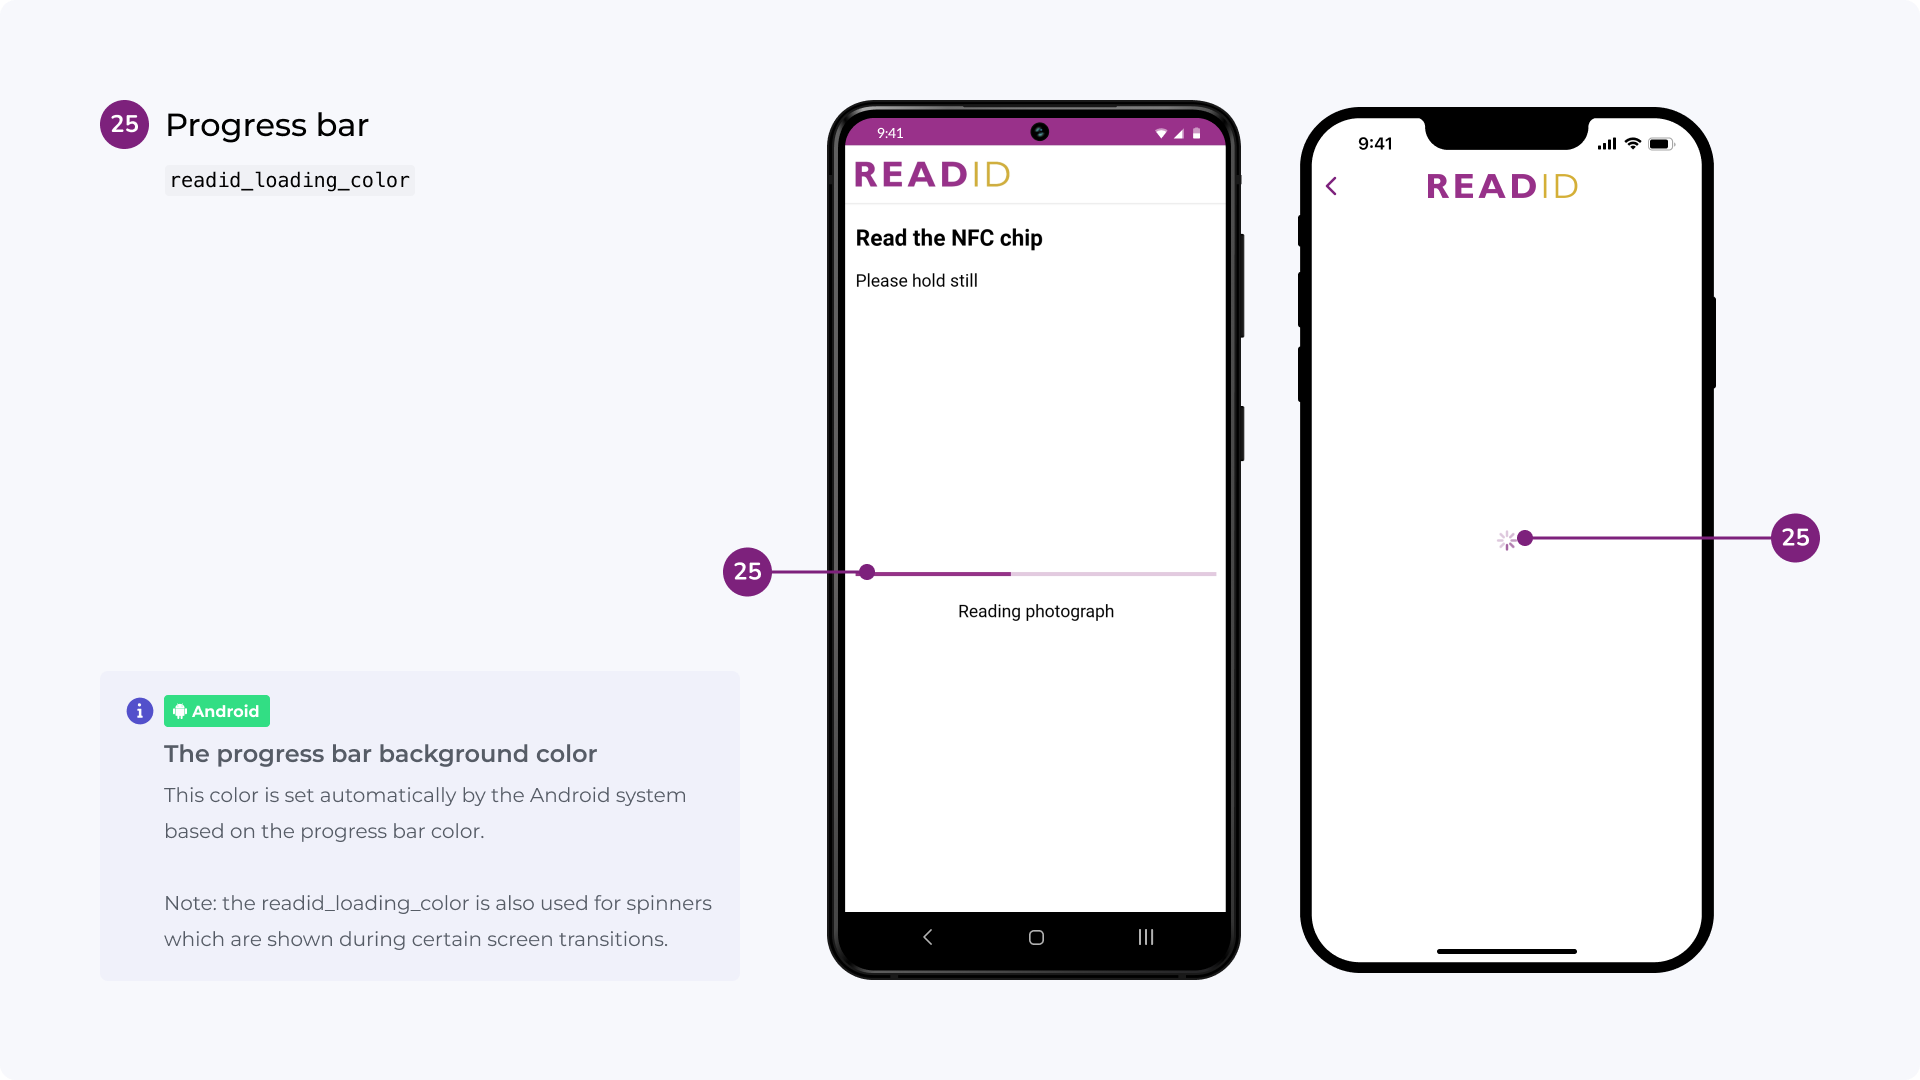
<color name="readid_loading_color">#973189</color>
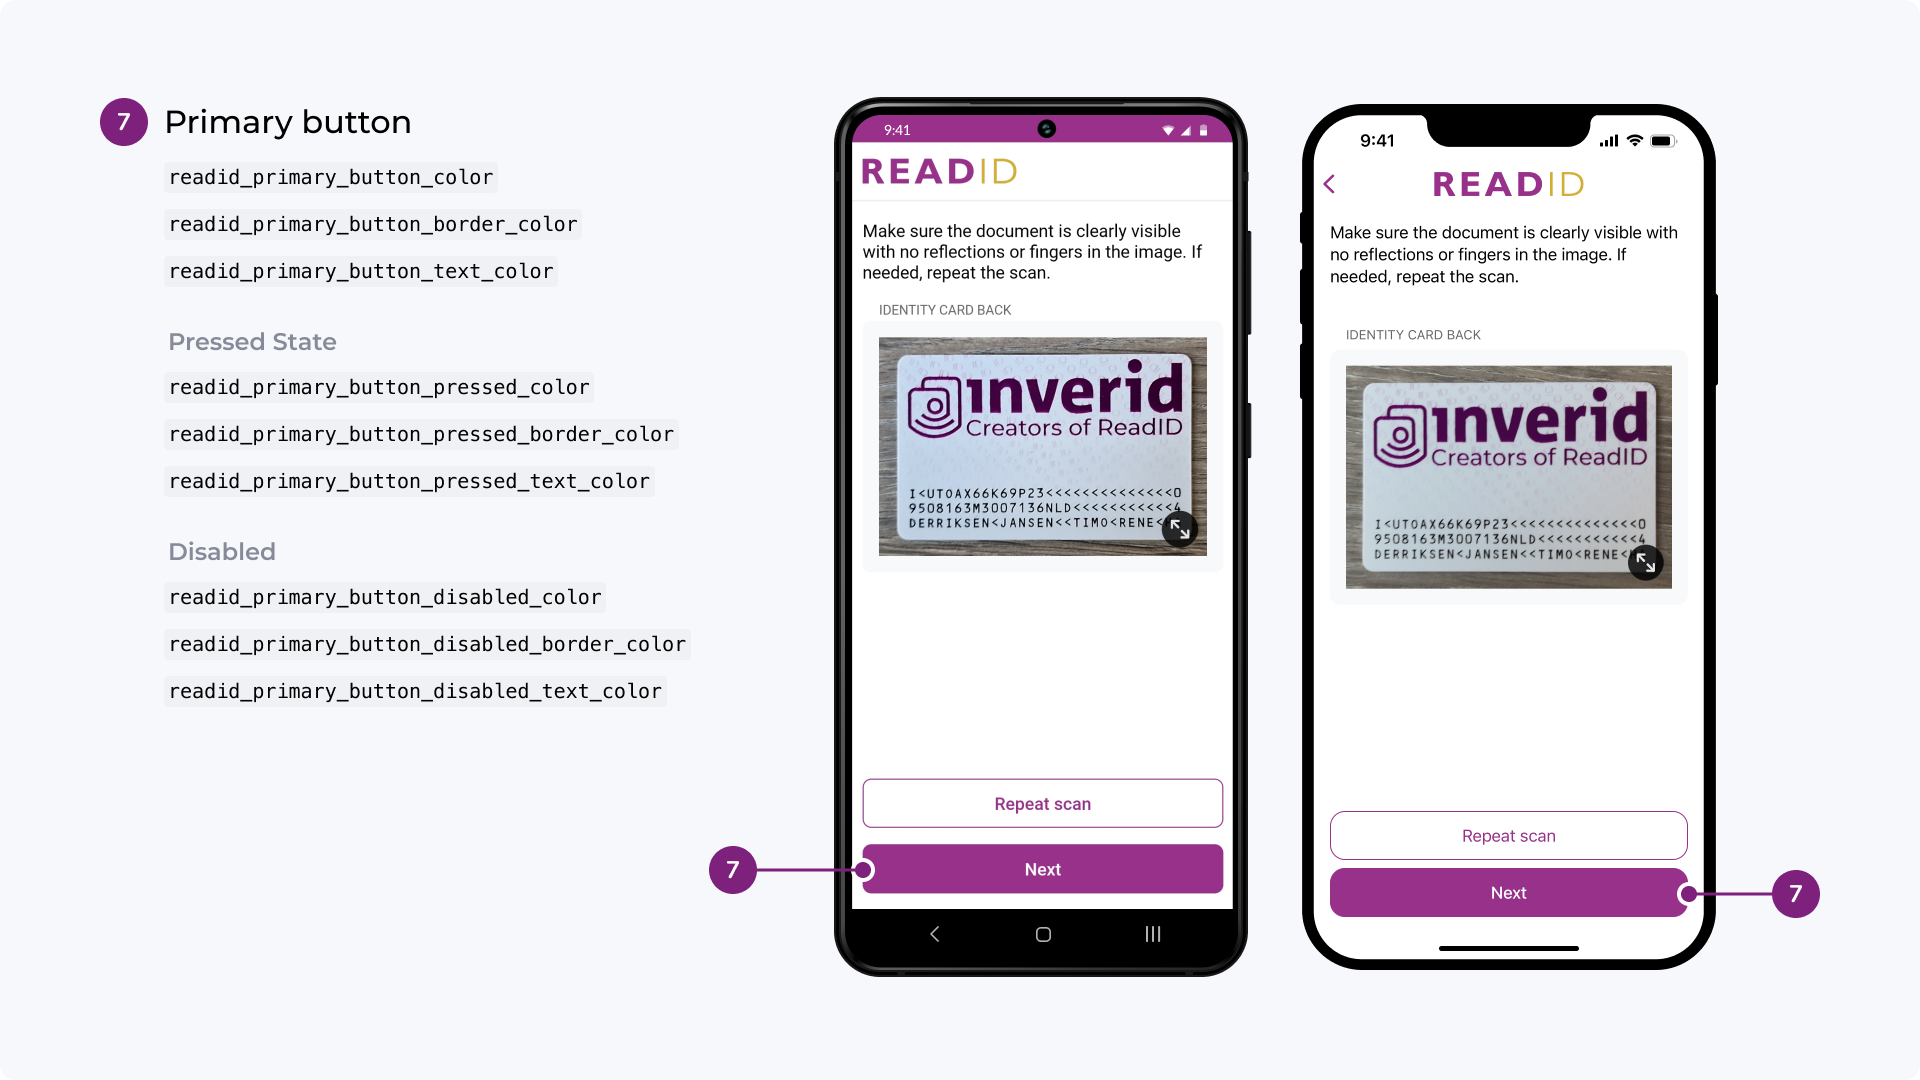
Primary button:
<!-- will change the primary button colors -->
<color name="readid_primary_button_color">#973189</color>
<color name="readid_primary_button_pressed_color">#48074C</color>
<color name="readid_primary_button_disabled_color">#CCCCCC</color>
<color name="readid_primary_button_text_color">#FFFFFF</color>
<color name="readid_primary_button_pressed_text_color">#FFFFFF</color>
<color name="readid_primary_button_disabled_text_color">#666666</color>
<color name="readid_primary_button_border_color">#973189</color>
<color name="readid_primary_button_pressed_border_color">#48074C</color>
<color name="readid_primary_button_disabled_border_color">#CCCCCC</color>
Secondary button:
<!-- will change the secondary button colors -->
<color name="readid_secondary_button_color">#FFFFFF</color>
<color name="readid_secondary_button_pressed_color">#EEDEEC</color>
<color name="readid_secondary_button_disabled_color">#FFFFFF</color>
<color name="readid_secondary_button_text_color">#973189</color>
<color name="readid_secondary_button_pressed_text_color">#48074C</color>
<color name="readid_secondary_button_disabled_text_color">#808080</color>
<color name="readid_secondary_button_border_color">#973189</color>
<color name="readid_secondary_button_pressed_border_color">#48074C</color>
<color name="readid_secondary_button_disabled_border_color">#808080</color>
Alert dialog:
<color name="readid_dialog_button_text_color">#973189</color>
<color name="readid_dialog_text_color">#333333</color>
<color name="readid_dialog_background_color">#F2F2F2</color>
VIZ wireframe:
<!-- will change the VIZ wireframe color -->
<color name="readid_viz_wireframe_color">#FFFFFF</color>
<!-- this will change the VIZ status text color -->
<color name="readid_status_text_color">#FFFFFF</color>
<!-- this will change the VIZ status text background color -->
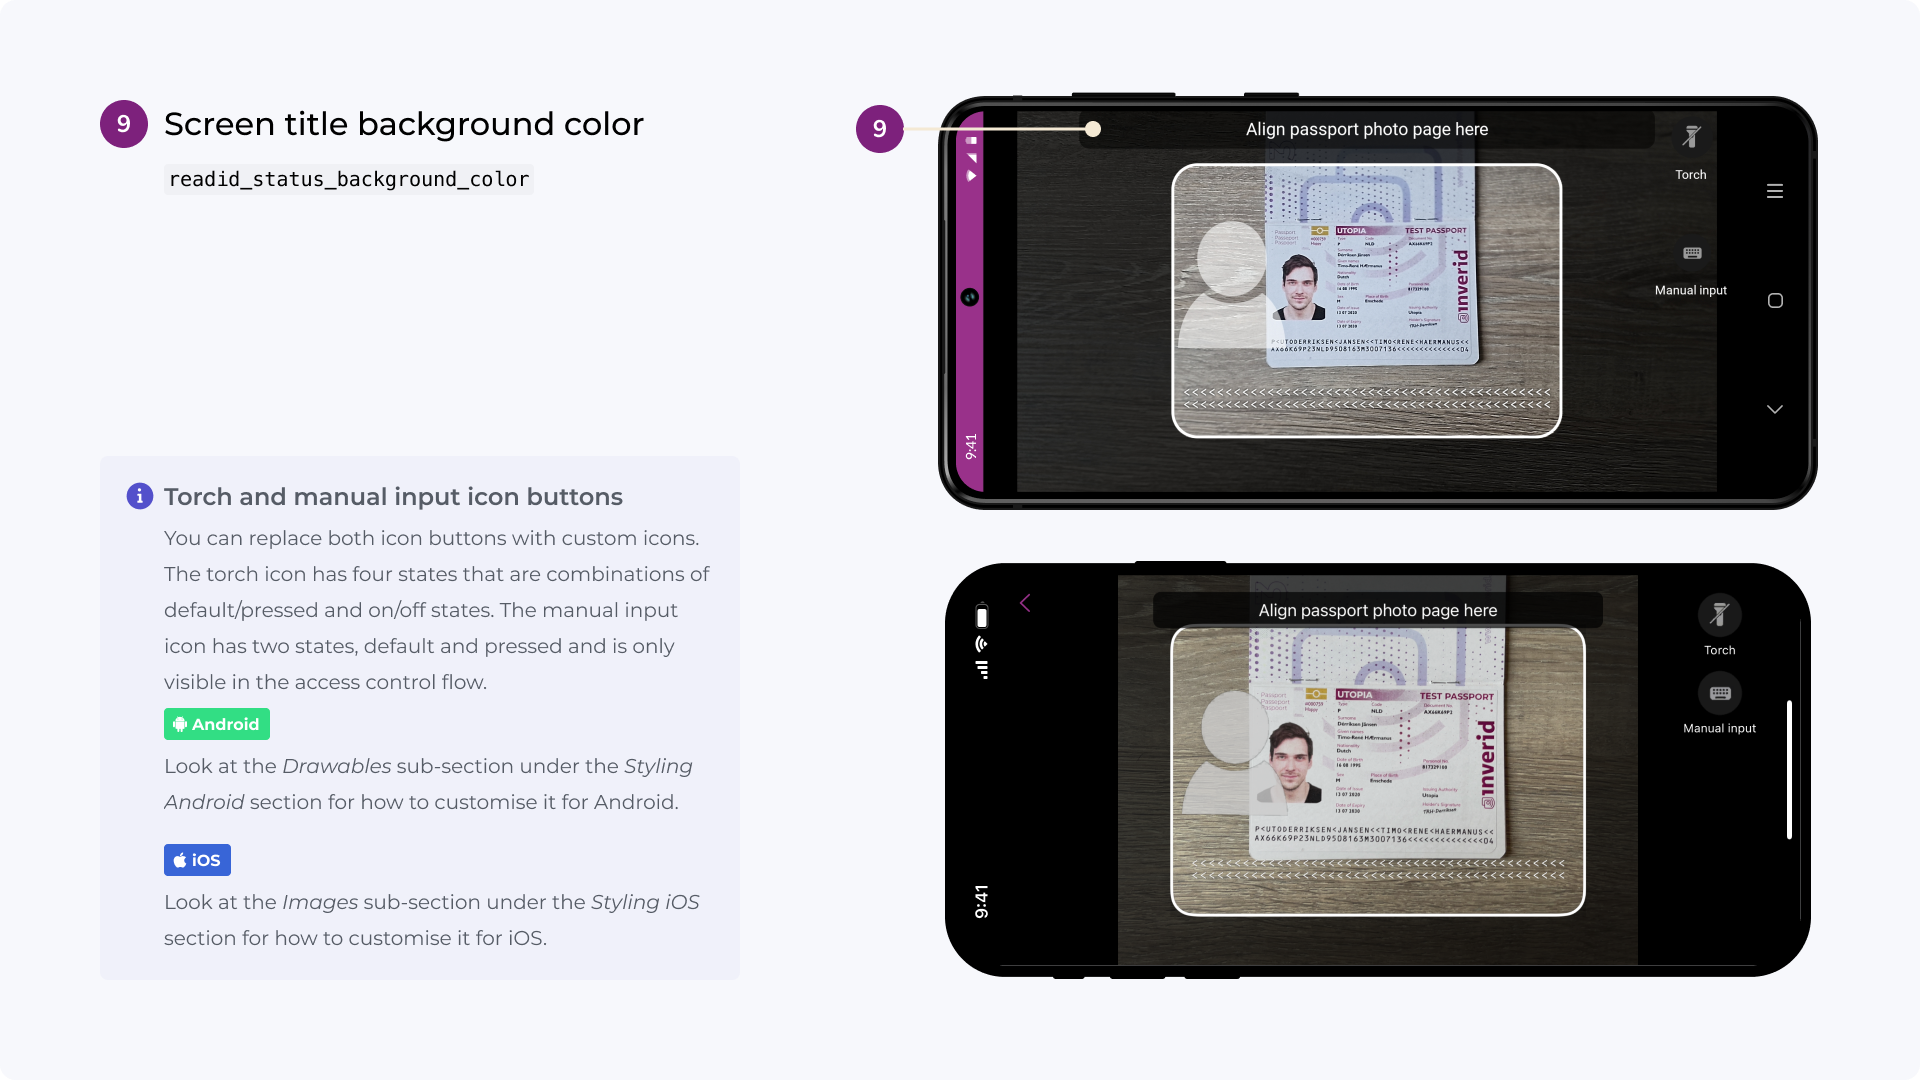
<color name="readid_status_background_color">#B3000000</color>
VIZ icon button:
<!-- will change the icon button text color on the VIZ scan
    screen -->
<color name="readid_button_icon_text_color">#FFFFFF</color>
Manual input:
<!-- will change the manual input field border color -->
<color name="readid_input_field_border_color">#973189</color>
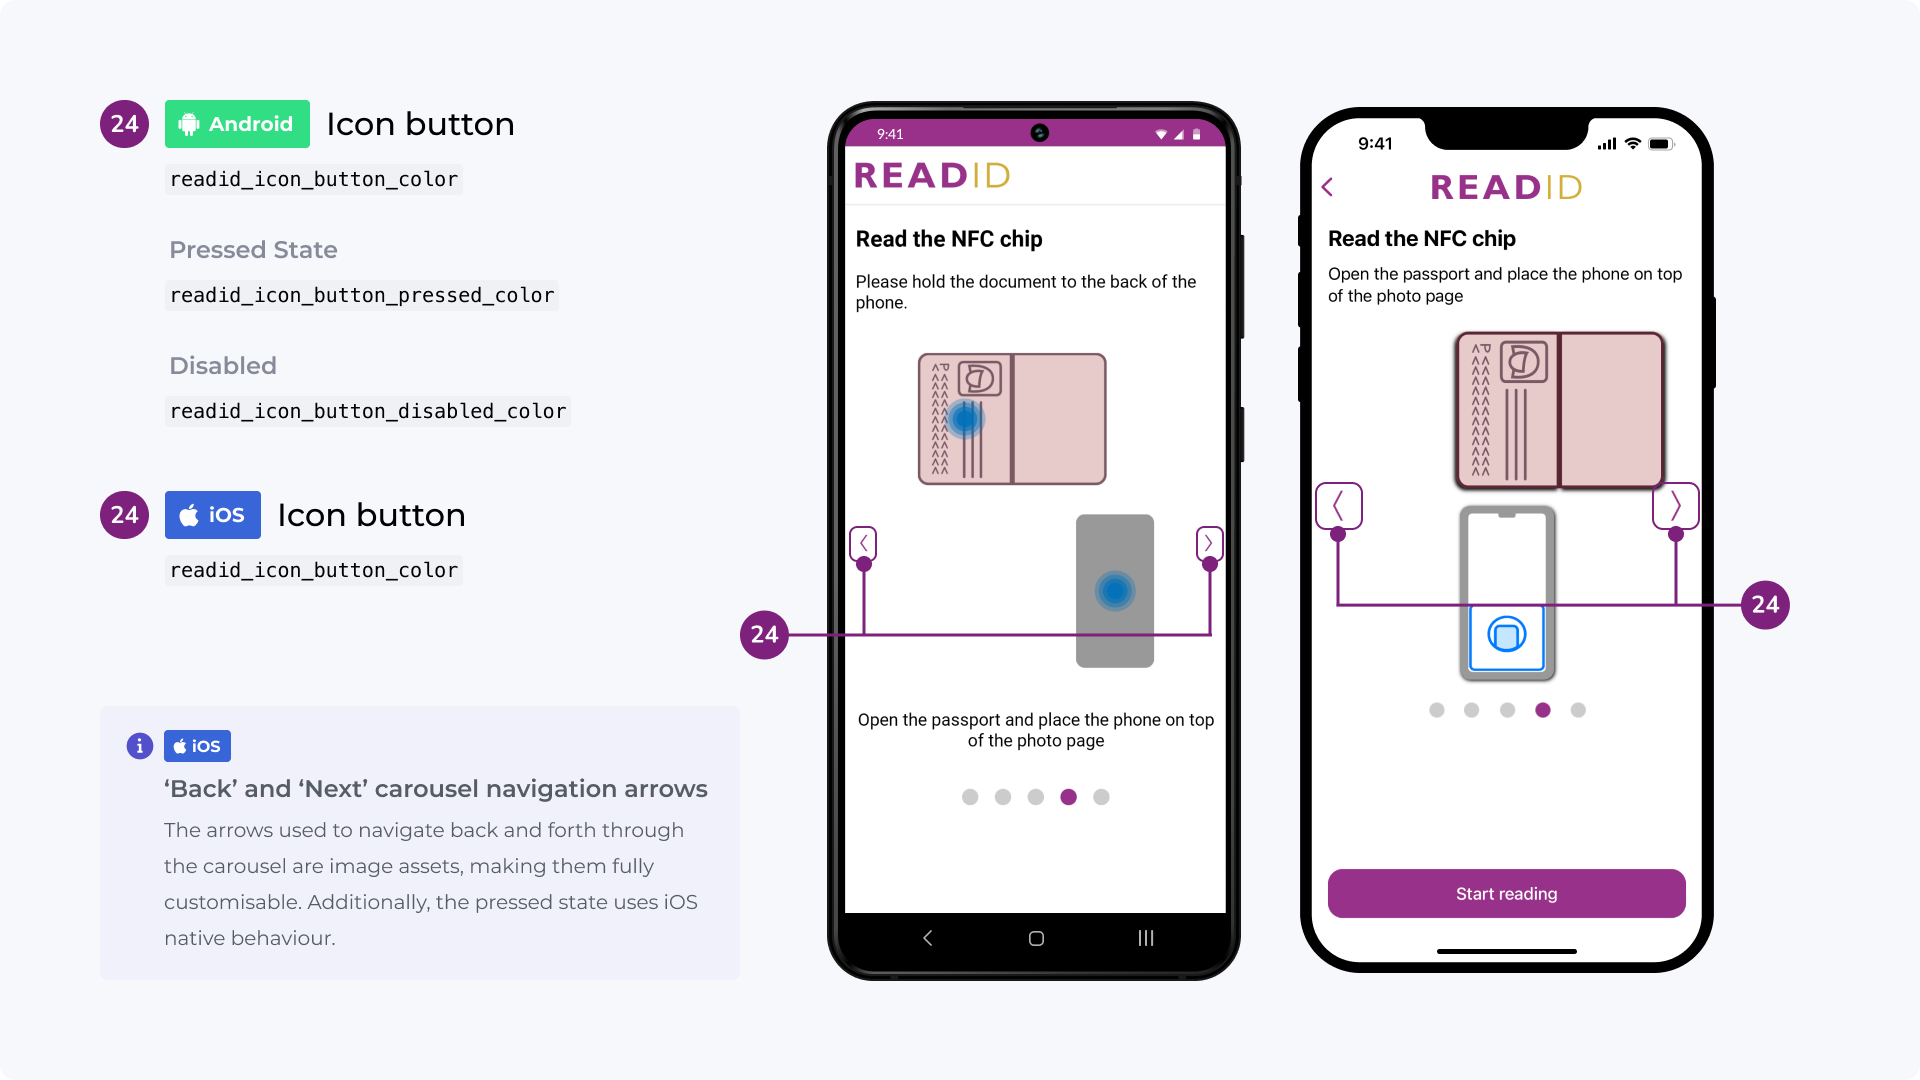
Carousel next and previous icon buttons:
<color name="readid_icon_button_color">#973189</color>
<color name="readid_icon_button_pressed_color">#48074C</color>
<color name="readid_icon_button_disabled_color">#CCCCCC</color>
Carousel progress:
<!-- will change the instruction carousel colors -->
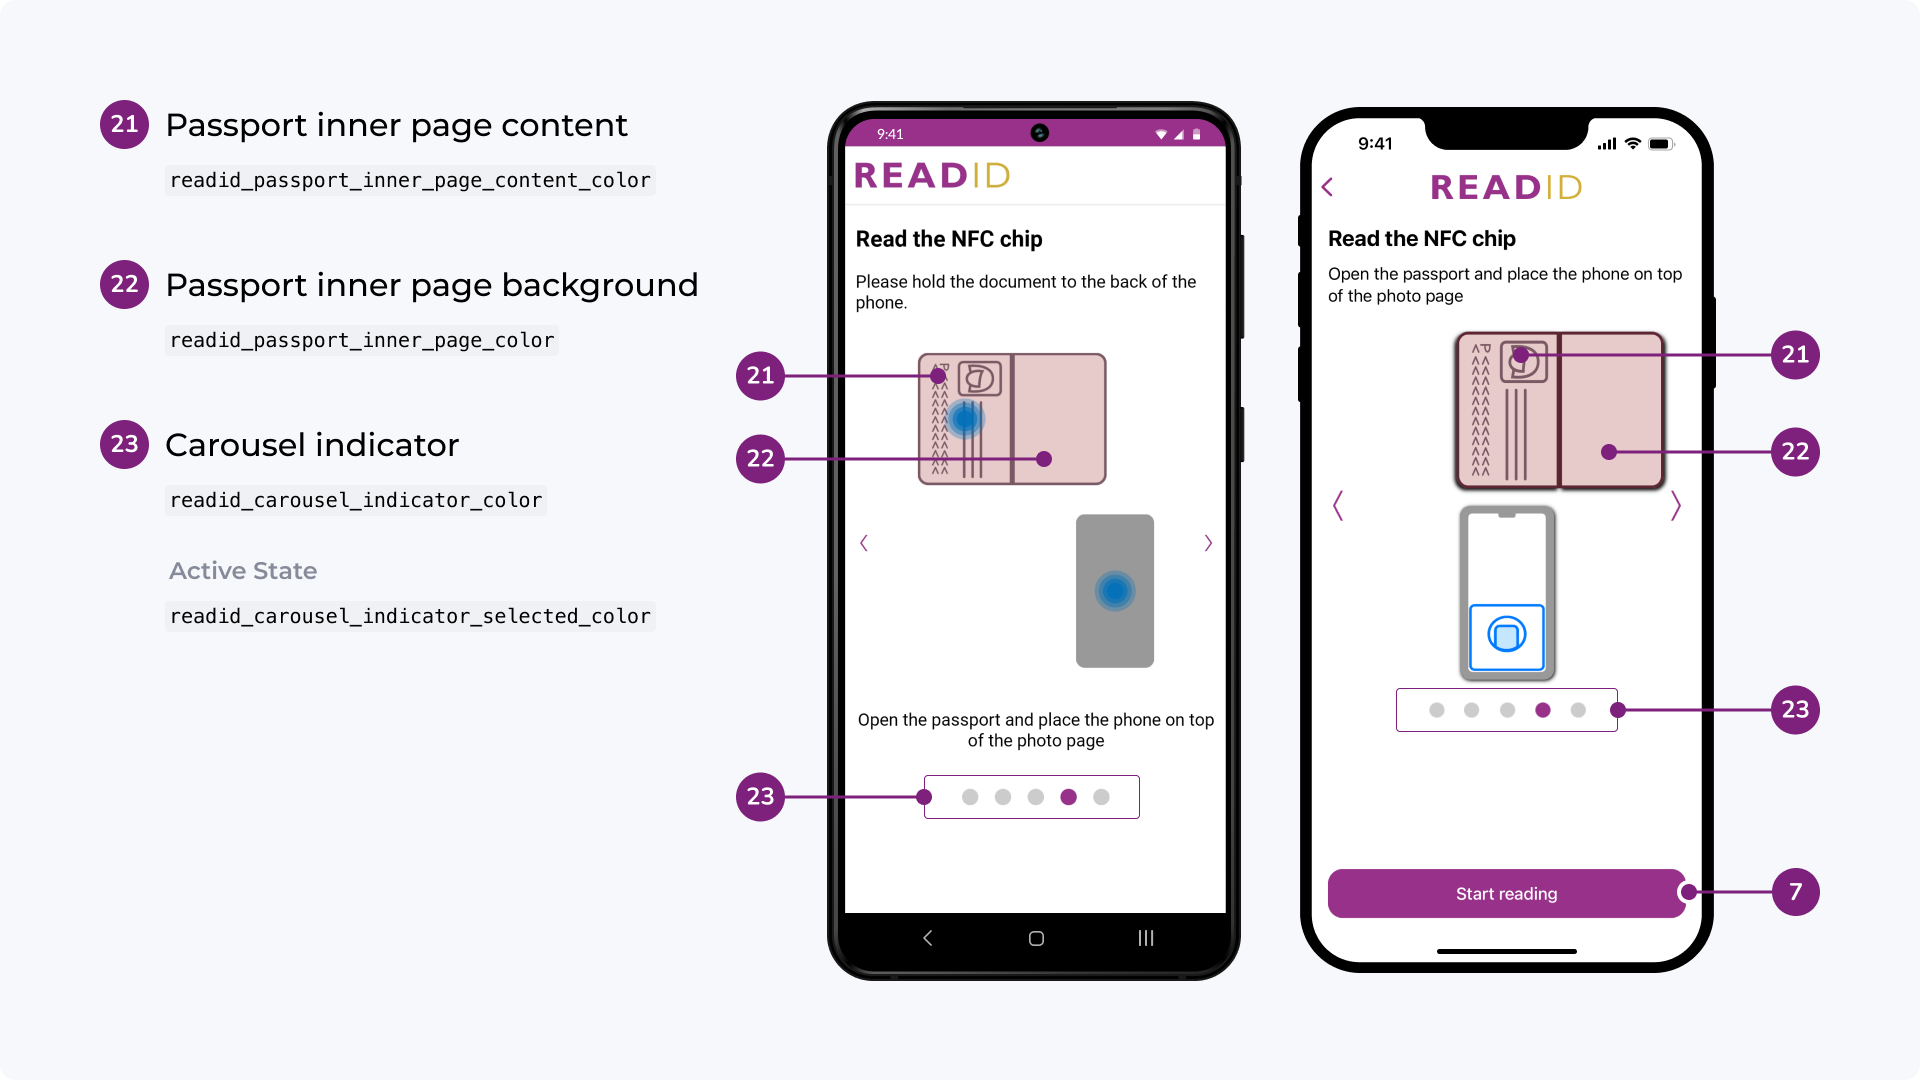
<color name="readid_carousel_indicator_selected_color">#973189</color>
<color name="readid_carousel_indicator_color">#CCCCCC</color>
Result screen row separator:
<!-- will change the horizontal divider line color on the
    result screens -->
<color name="readid_row_separator_color">#D6D6D6</color>
Success, error and warning colors:
<!-- will change the success/error/warning text color on the
    VIZ capture and result screens -->
<color name="readid_success_color">#077D55</color>
<color name="readid_warning_color">#FF8C00</color>
<color name="readid_error_color">#B00020</color>
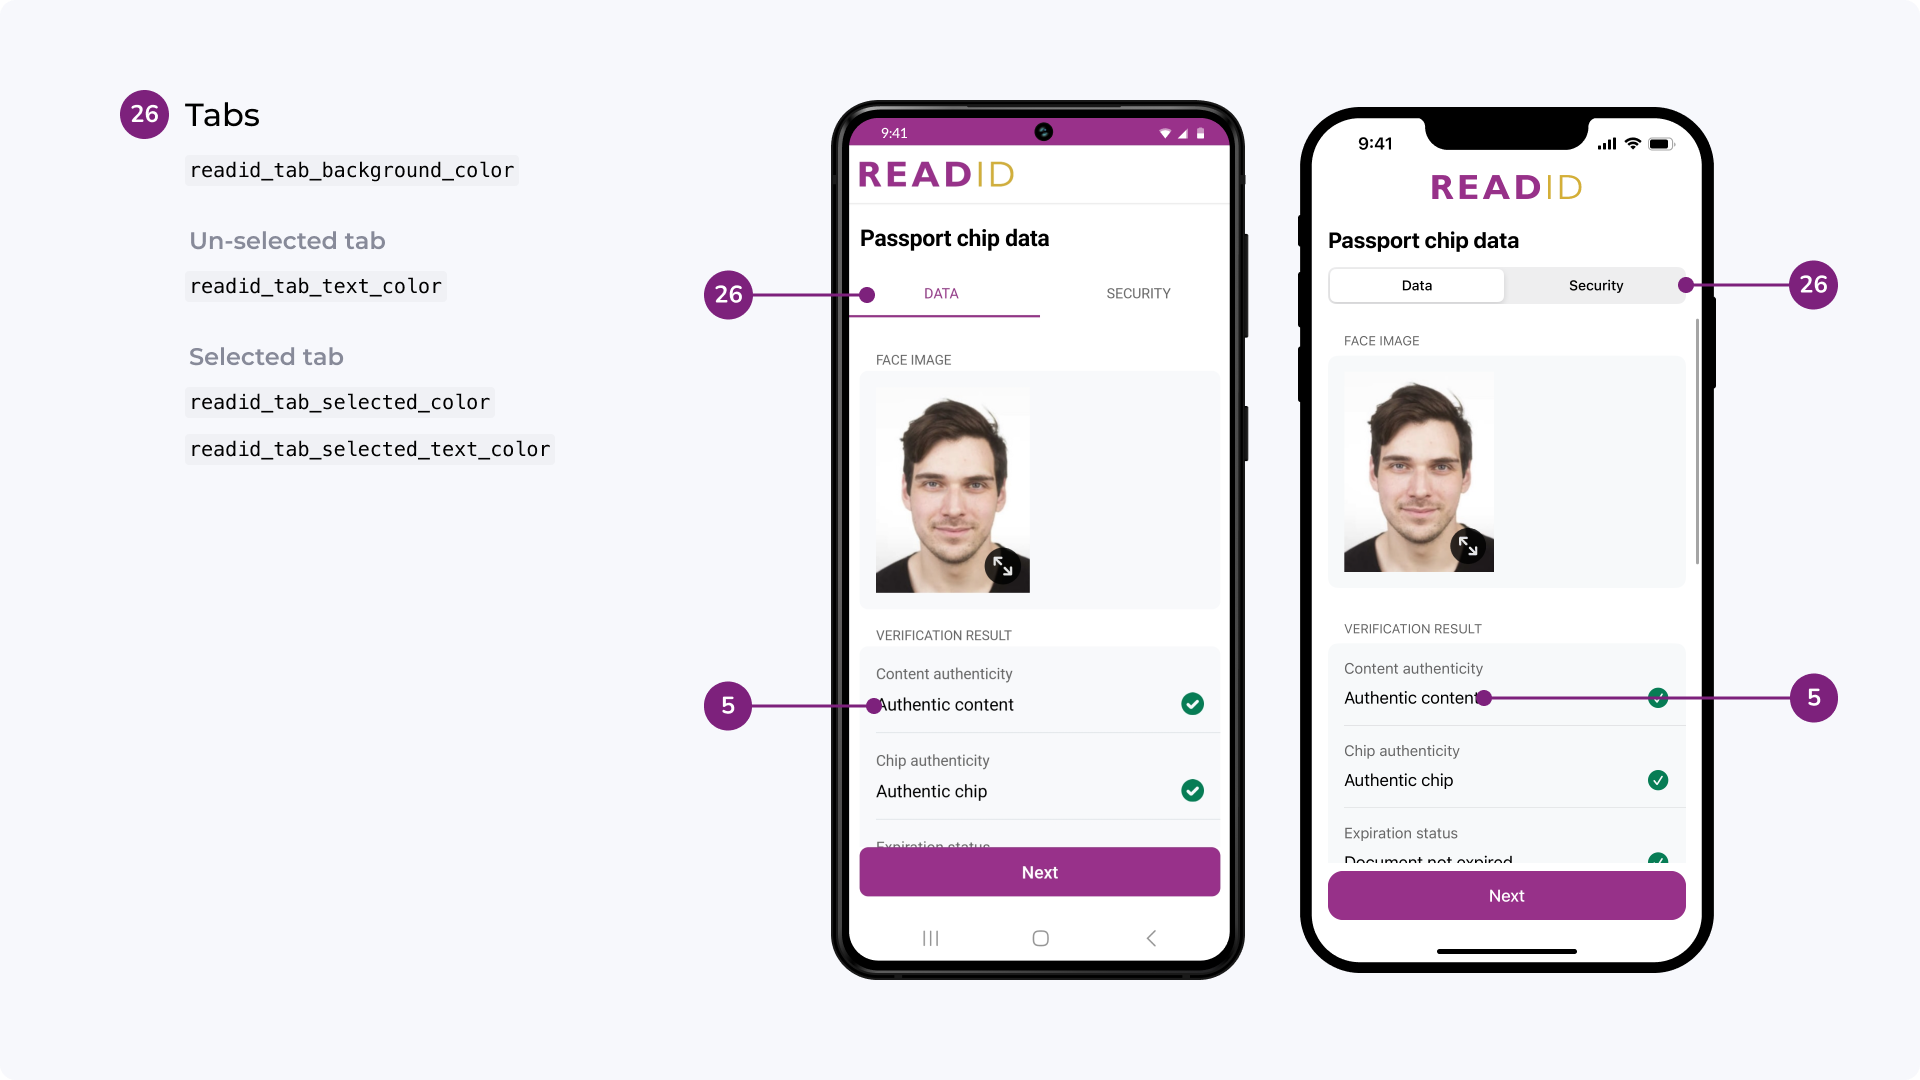
Result tabs colors:
<!-- will change the tabs on the VIZ and NFC result screens -->
<color name="readid_tab_selected_color">#973189</color>
<color name="readid_tab_selected_text_color">#973189</color>
<color name="readid_tab_text_color">#666666</color>
<color name="readid_tab_background_color">#FFFFFF</color>
<color name="readid_tab_divider_color">#CCCCCC</color>
Animation colors:
<!-- will change the color used for the touch point in animations -->
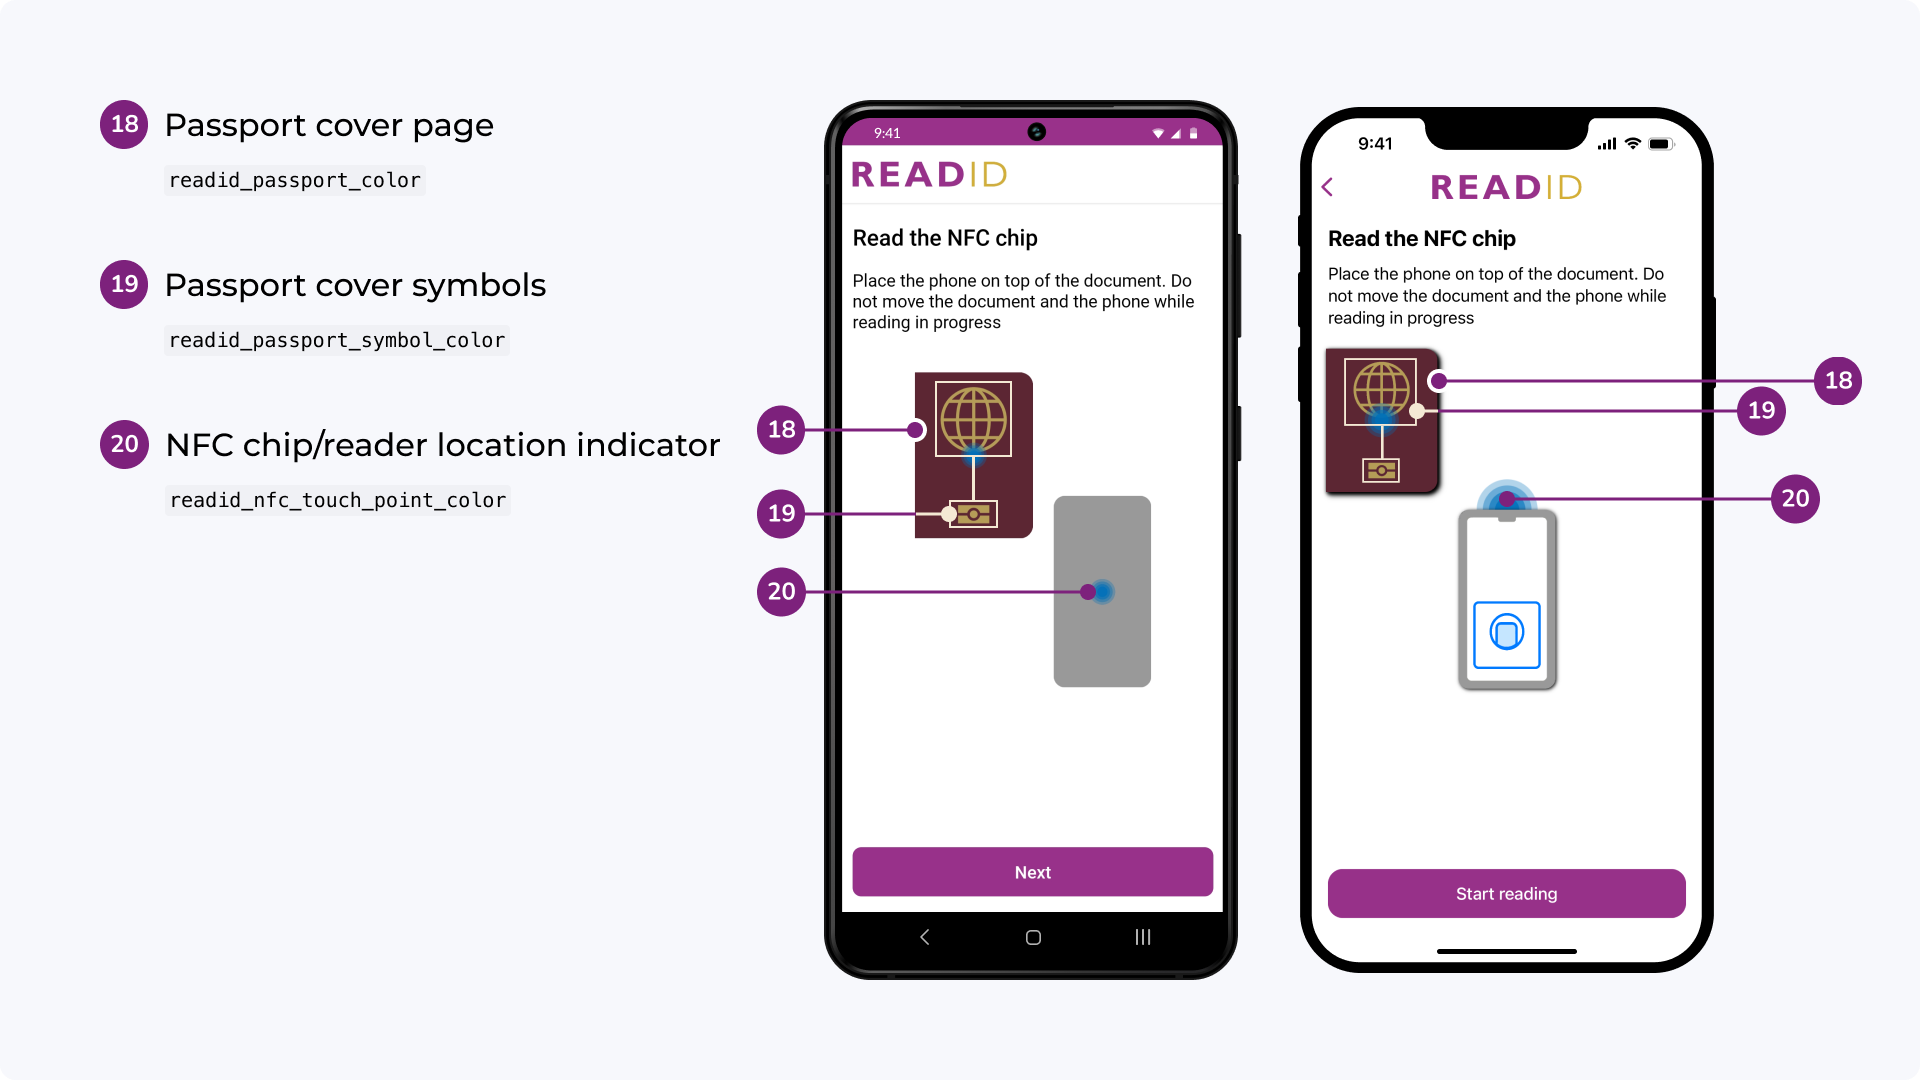
<color name="readid_nfc_touch_point_color">#0070BA</color>
<!-- will change the colors used for the passport in animations -->
<color name="readid_passport_color">#5C2633</color>
<color name="readid_passport_symbol_color">#B59D57</color>
<color name="readid_passport_inner_page_color">#E7CBCA</color>
<color name="readid_passport_inner_page_content_color">#7A5864</color>
iOS color customisation
Colors can be configured statically through your .xcassets file. Every iOS app includes at least one asset catalogue by default, which serves as a centralized location for managing assets like images, colors, and data. To add a color to your asset catalogue, simply open the .xcassets file in Xcode, create a new color set, and define your desired color values.
The .xcassets color names are in the format of readid_<lower-case enum value using snake case> for example: readid_background_color.
All above listed resources can be changed for light and dark mode.
Dark mode can be disabled by adding the following property to your app's info.plist:
<key>UIUserInterfaceStyle</key>
<string>Light</string>
iProov #
Facial verification is an additional service that this plugin can provide if it was contractually agreed upon. iProov is a facial verification service that verifies that there is a real, live person doing the identity verification and that their face matches the photo from the NFC chip of their document. It does this by taking a selfie-video and the face image from the document, and sending both to iProov for verification.
iProov facial verification takes place after reading the user's identity document, so that the ReadID Server can enrol the authentic, verified face image from that document to iProov. The face image is used as a reference image for comparison with the selfie video. Once the iProov service has completed the assessment, the verification results are added to the ReadID session and can be retrieved from the ReadID Server.
ReadID is also able to use the face image extracted from the document's Visual Inspection Zone (VIZ) instead of the chip. This is only intended as a fallback scenario for when the chip cannot be read, and should be used with caution.
Using a VIZ face image is considered to be much less reliable than using the image read from the chip, as VIZ images are not subject to the authenticity and clone detection mechanisms that apply to chip data. We cannot guarantee that we have extracted the correct, original face image. A malicious user can trick ReadID VIZ because of bad lightning, poor camera quality, etc. If you decide to use the VIZ face image for iProov, we strongly recommend to do so only in combination with optical orchestration and to perform manual check of the face image. All VIZ images are available via the management portal, the REST API, and in the PDF.
To combine iProov facial verification with ReadID, you will need to configure it on the ReadID server and implement it within your Flutter app. To configure it on the server:
- Enable iProov for the submitter application that you use in your app.
- Ensure that you have selected the correct profile, Genuine Presence Assurance or Liveness Assurance.
To implement orchestration with iProov from within your flutter app, you must add the iProov flutter plugin to your project. It is available at https://github.com/iProov/flutter, including instructions to add the iProov plugin. It is required to make a "selfie video" that will be analyzed and compared with the reference face image.
Then, for each iProov orchestration session, implement the following:
- Make sure that the ReadID session has been committed to the server before starting the iProov
process. The session is normally committed automatically by the ReadID SDK, unless you prevent
session commits via your
Flowconfiguration. - Start an iProov attempt by requesting an iProov token using
retrieveIProovVerifyTokenmethod. - Launch the iProov SDK to take the user's selfie video:
- Finalize the attempt and retrieve iProov verification results using
validateIProovVerifyTokenmethod. - Repeat steps 2-4 until the user passed verification or until there are no more attempts left.
Start an iProov Attempt:
Use the retrieveIProovVerifyToken method to start the iProov process. This is an asynchronous call
that does two things:
- Request the ReadID Server to enrol the reference face image (taken from the already committed session) with iProov.
- Return a token that can be used to start the iProov SDK.
The retrieveIProovVerifyToken response, successful or not, is always returned via a callback. The
ReadID SDK will poll the ReadID server for a response, for at most 10 times with a delay of 1 second
between each request.
Start the iProov SDK:
Once you have a valid iProov verifyToken, start the iProov SDK using the IProov.launch() method.
A detailed explanation of how to configure the iProov SDK, use the launch() method, implement the
required callbacks, and obtain and interpret the results which is provided on the Github page of
iProov flutter plugin. The page also contain information on how to handle failures and errors during
this step of the process.
Once the iProov SDK has reached a final state (success, failure, cancelled, or error) you must
continue to the next step, regardless of the result.
Finalize the iProov attempt:
Use the validateIProovVerifyToken method to finalize the iProov attempt. This step also tells
ReadID server that the iProov token was used and that the server should start polling iProov for
verification results. If you do not perform this step, then the ReadID server will mark the iProov
session as “abandoned” after 30 minutes, regardless of what happened during the previous step. In
addition, the next retrieveIProovVerifyToken would return the same token as the one for the
previous attempt.
As with retrieveIProovVerifyToken, the validateIProovVerifyToken response is always returned via
a callback. The ReadID SDK will poll the ReadID server for a result, for at most 10 times with a
delay of 1 second after each request.
The results of the iProov check are available in the Management portal, in the iProov section of the ReadID session details.
The main fields to check are:
Passed iProov: If true, then iProov concluded that a real person was present and that their
selfie matches the face image from their document. When using iProov Genuine Presence Assurance,
iProov also concluded that the authentication was done in real-time (as opposed to, for example, an
injected replay). See the iProov website for a more detailed explanation of what their assurances
mean. The corresponding ReadID session field is iProovSession.passed (boolean).
Enrolment image source: The source of the image used for the selfie-check. The image can come
from the chip or from the optical capture of the Visual Inspection Zone (VIZ). The corresponding
ReadID session field is iProovSession.enrolmentImageSource (string).
Any enrolment image source other than NFC is considered to be (much) less reliable. Images that do
not come from the chip are not subject to all of ReadID's verification mechanisms that apply to chip
data. If the image was sourced from the VIZ, we strongly recommend doing a manual check of the image
used for facial verification.
Assurance type: the iProov verification assurance type used during this session, which is either
Liveness Assurance or Genuine Presence Assurance. The corresponding ReadID session field
is iProovSession.assuranceType (string). See the iProov website for a detailed explanation of what
these verification assurances mean.
Optical Orchestration #
Not all identity documents have a (readable) NFC chip. To handle documents without a readable chip, you can combine ReadID with an optical document verification solution. ReadID supports multiple flows that allow you to scan the sides of a document required for optical verification. The results of the optical verification are added to the ReadID session that can be retrieved from the ReadID server. ReadID supports two optical verification vendors: "Veriff" and "Onfido". The service is only available for the SaaS SDKs. Optical verification requires that you also use either iProov Enroller (Genuine Presence Assurance) or Basic Face Verifier (Liveness Assurance). If you combine iProov with Veriff, we strongly recommend to use the by Veriff provided cropped face image (if the face image from the chip is not available).
The face image cropped from the VIZ by the ReadID SDK is not a reliable source. The identity document may be manipulated (e.g., face image replaced) or an attacker may feed a different face image to the ReadID server. ReadID does not perform any authenticity checks on the captured image. If you use this option, be sure to verify the results.
Overview
Optical orchestration must be enabled on the ReadID server and implemented within your mobile app.
To enable optical orchestration on the server, login to the Management Portal with a user that is allowed to manage submitter applications and update the following settings:
- Enable iProov and configure the allowed sources for the face image.
- Enable and configure Veriff or Onfido.
Consult the ReadID Server- or Management Portal Administration Guide for more information or contact the ReadID support if needed.
Before doing optical orchestration in your mobile app, you should:
- Implement a ReadID flow that accounts for documents without a readable chip and/or where chip-reading fails. Make sure that the result of the ReadID flow(s) contains one or two VIZ images of the document if you plan to proceed to optical orchestration. You would typically chain one or more
VIZOnlyOnePageFlow's andNFCOnlyFlowto achieve this. You can also use the less flexible but easier to useNFCWithVIZFallbackFlow. - Ensure all results are submitted to the ReadID server.
- Proceed to optical orchestration when necessary, for example when there are no NFC results at all, but possibly also when verification (in particular clone detection) failed.
Optical orchestration implementation:
- Once the ReadID session (including all VIZ data) has been submitted, initiate optical orchestration via
(ClientServer)ReadIDSession.verifyOnfidofor Onfido or(ClientServer)ReadIDSession.verifyVerifffor Veriff. The ReadID server will not begin the optical orchestration process unless you use that method. If a fatal error is returned, cancel the process or start over by capturing new VIZ images in a new ReadID session. - While the optical orchestration process is running on the server, the app can already proceed with iProov (see iProov Facial Verification). However, when using Veriff, you should wait at least 3 seconds in order to confirm that Veriff is able to provide the face image to iProov. See below for more details.
- After iProov was successfully completed and validated, the ReadID session can be finished by calling
(ClientServer)ReadIDSession.finish. This will notify the ReadID server that the app will take no further action that can update the resulting ReadID session, allowing the server to finish the session as soon as possible and trigger the session webhook (if configured).
It is typically neither necessary nor good practice to wait more than a few seconds for the optical verification process to finish before going to the next step in your app. Should you choose to wait for a longer period and/or show any status or intermediate results to the user, you can continue to poll the status using the verifyOnfido or verifyVeriff method.
Optical verification can take a long time, typically too long to let users wait for it. At this time, Veriff can take up to 45 minutes to complete and Onfido up to 6 hours.
Note that you must always start optical orchestration first, iProov second. Starting iProov first may cause the ReadID server to finish the session, meaning it is no longer possible to start optical orchestration. This scenario results in a HTTP 409 error response to the verifyVeriff or verifyOnfido call.
Technical implementation details
To start Onfido, call:
try {
    final onfidoDecision = await plugin.verifyOnfido(sessionId: sessionId);
    // Handle result
} on PlatformException catch (exception) {
    // Handle orchestration errors
}
To start Veriff, call:
try {
    final veriffDecision = await plugin.verifyVeriff(sessionId: sessionId, submissionId: submissionId);
    // Handle result
} on PlatformException catch (exception) {
    // Handle orchestration errors
}
The app should implement the following polling logic when the cropped face image from Veriff is used for iProov (recommended):
- Veriff needs up to 3 seconds to provide a cropped face image. Therefore the app must poll repeatedly, with at least a 1 second delay, until either 3 seconds have passed or until one of the following conditions occurred:
- The app received a
verifyVeriffResponse.veriffResponse.messagewith valueface_crop_not_found_before_retrieval_timeout. In that case Veriff was unable to extract a face image, usable for iProov verification, and a restart of the entire process starting from a new ReadID session is required. - The app received a
verifyVeriffResponse.veriffResponse.verification.status. In that case Veriff has reached a verdict. The valuestatuswill be eitherapproved,resubmission_requested, ordeclined. The verification statusresubmission_requiredindicates that a new VIZ capture should be submitted under the same Veriff session. To do so, store thesubmissionIdfor later use, perform one or two new VIZ captures in a new ReadID session, then retry optical verification using the savedsubmissionIdas parameter for theverifyVeriffcall.
- The app received a
- If there was no verdict or error for at least 3 seconds, you may proceed to iProov verification.
If the face image cropped from the VIZ by the ReadID SDK is used for iProov (not recommended), a single call without error is enough to proceed with iProov.
Advanced #
Custom CSCA Master List (client-only) #
Note that we actively maintain the default master list in order to keep it up-to-date. If you replace the default master list with a custom master list, you must ensure to keep the custom master list up-to-date as well.
Embedded, static custom master list (iOS) #
ReadID-UI contains two default master list files to verify NFC data signatures:
- CSCA (version/date tbd)
- RDW (Dutch Driving Licence)
Custom master lists can be configured by adding your own versions of the files below to your project:
MasterList.crtMasterList.ml
Embedded, static custom master list (Android) #
The client-only version of the ReadID UI SDK contains a default master list of CSCA certificates used to verify data signatures. The default master list can be overridden by creating your own keystore with your own master list, naming it csca.ks and adding it to the raw resources folder of your application:
raw/csca.ks
Dynamic custom master list #
Flutter does not support changing the CSCA master list at runtime at this time.
ReadID Flutter Plugin Data Model Documentation #
Flow Objects #
Flow objects in Dart are write-only, meaning all properties have setters only. Default values for properties can be consulted in our native SDK documentation.
Not available at this current time for NFC/VIZ
vizConfirmationScreenConfiguration: n/avizResultScreenConfiguration: n/aisTouchToFocusEnabled: n/a (Android only)
(Abstract) Flow #
Properties
applicationLevelEncryptionPins: ListaccessKey: String?backgroundTimeout: int (TimeInterval on iOS, long on Android)baseUrl: String? (called baseURL on Android)dateFormat: DateFormat enumdateSeparator: DateSeparator enuminstructionsPlayCount: intisDebugEnabled: n/a (not exposed to Flutter yet)language: String?oAuthToken: String? (oauthToken on iOS)opaqueID: String?preventSessionCommit: boolreadIDSession: ReadIDSession? (Map?)readIDTracker: n/a (not supported in Flutter yet)screenOrientation: ScreenOrientation enum (Map)shouldAllowScreenshots: bool (Android only)shouldAskDismissConfirmation: bool (iOS only)shouldMaskPersonalData: boolshouldOnlyShowInstructionsOnFirstUse: boolshouldUsePinning: booluiResources: n/a (not supported in Flutter yet)customBundleName: String (iOS only)
VIZOnlyOnePageFlow #
Properties
allowedPageTypes: ListallowManualCaptureAfterTimeout: int (Long on iOS)faceImageFeatureRequirement: FeatureRequirement enumfastCaptureMode: boolmrzFeatureRequirement: FeatureRequirement enummrzValidation: MRZValidation enumqrCodeFeatureRequirement: FeatureRequirement enumshouldAllowLoweringQualityRequirements: boolshouldRequireNoFingerOnDocument: boolshouldRequireNoGlareOnDocument: boolshouldRequireSharpImage: boolshouldPlayShutterSound: boolshouldShowDocumentSelection: boolshouldShowTorchButton: boolshouldShowVIZConfirmation: boolshouldShowVIZResult: bool
NFCWithAccessControlFlow #
Properties
manualInputMode: ManualInputMode enumshouldCommitSessionWithoutNFC: boolaccessControlOption: n/aallowResumeNFCReading: n/aallowSkipReadingAfterAttempts: intallowedDataGroupsToRead: ListallowedDocumentTypes: ListextendedLengthAPDUPreference: n/anfcResultScreenConfiguration: n/ashouldCommitSessionWithSkipButton: n/a (iOS only)shouldPlayShutterSound: boolshouldReadImages: boolshouldRequirePersonalNumber: boolshouldShowDocumentSelection: boolshouldShowNFCResult: boolshouldShowTorchButton: boolshouldShowVIZConfirmation: boolshouldShowVIZResult: bool
NFCOnlyFlow #
Properties
accessControlOption: AccessControlOption enumallowedDataGroupsToRead: ListallowResumeNFCReading: boolallowSkipReadingAfterAttempts: intdocumentInfo: DocumentInfo (Map, used as optional constructor parameter)extendedLengthAPDUPreference: ExtendedLengthAPDUPreference enumnfcAccessKey: NFCAccessKey (Map, used as required constructor parameter)nfcResultScreenConfiguration: NFCResultScreenConfiguration (Map)preventChipSupportDialog: boolshouldReadImages: boolshouldShowInstructionCarousel: boolshouldShowNFCResult: booltrustedCertStores: n/a (Android only)
Result Objects #
Result objects in Dart are read-only data objects that contain the VIZ and NFC results from a successful ReadID session.
ReadIDResult #
Properties
vizResult: VIZResult?nfcResult: NFCResult?
(Abstract) BaseResult #
An abstract base class that holds properties common in both VIZResult and NFCResult.
NFCResult extends BaseResult #
Properties
faceImage: Uint8List?signatureImage: Uint8List?- Additional properties detailing the outcomes of the ReadID session.
ReadIDSession #
Encapsulated a session where information from a single document is captured. It can contain data read through NFC as well as optically captured data.
class ReadIDSessionState:
A memento that carries the state of a ReadIDSession at some point in time.
Initializers
init()
Create a new session
Instance Properties:
var clientConfiguration: ClientConfiguration?var clientId: StringAn identifier that identfies the application that captured this sessions.var consolidatedIdentityData: ConsolidatedIdentityData?The consolidated identity data.var creationDate: Date?The date the session was stored.var customerApplicationReference: String?An opaque value customers can use to store a reference for their own internal use.var deviceId: StringA unique identifier for the device that captured this sessionsvar documentContent: MRTDDocumentContent?Contents of the document, this data is extracted from the data read from the NFC chip.var expiryDate: Date?The date when this session expires.var expiryTimestamp: Int64?The Unix timestamp for the moment the session will expire.var instanceId: StringA unique identifier for the application installation that captured this session.var nfcSession: NFCSessionContains data captured from the document using NFC.var opaqueId: String?This customer-provided identifier can be used by our customer to cross-reference this ReadID Session to an app session identifier.var sessionId: StringA unique identifier for the session.var vizImages: VIZImages?Contains data optically captured from the Visual Inpection Zone (VIZ).func restoreState(from: ReadIDSessionState) throwsRestore state of a ReadIDSession.func saveState() -> ReadIDSessionState?Save state of ReadIDSession.
License #
Please read the LICENSE file before using this plugin. Note that the native Android and iOS ReadID SDKs have a separate license.
Help and support #
You may find your question is answered in the documentation of our native SDKs. This documentation is available via our ReadID Documentation portal.
For further help with integration of the plugin, please contact support.
Metadata
Publisher
Weekly Downloads
Metadata
A Flutter plugin for integrating ReadID's native iOS and Android SDKs. This plugin wraps ReadID's native SDKs.
Documentation
License
![]() BSD-3-Clause (license)
BSD-3-Clause (license)
Dependencies
flutter, plugin_platform_interface