widget_toolkit_pin 0.0.2-dev.2  widget_toolkit_pin: ^0.0.2-dev.2 copied to clipboard
This package provide out of the box entering PIN code functionality, which can be used with biometric authentication.
![]()
![]()
![]()
![]()
Widget Toolkit Pin #
Widget Toolkit Pin provides a page for entering pin code and might be used with biometrics. The package uses the local_auth package, in order to provide an automatic prompt of a platform dialog that asks you to enable or disable biometrics at the application level.
Demo #
| Save Pin And Enable Biometrics | Biometrics Authentication | Auto Biometrics Authentication |
|---|---|---|
 |
 |
 |
| Biometrics Not Recognized | Biometrics Not Setup | Biometrics Not Supported |
 |
 |
 |
| Wrong Pin Code | ||
 |
Features #
- Customizable length of the pin up to 10 digits
- Masked row with entered numbers and fancy animation
- Build in keyboard with pressed state of buttons
- Two customizable icon buttons on right side of the zero with default delete, auto submit and biometrics functionality
- Optional error handling by the user
- Biometric authentication
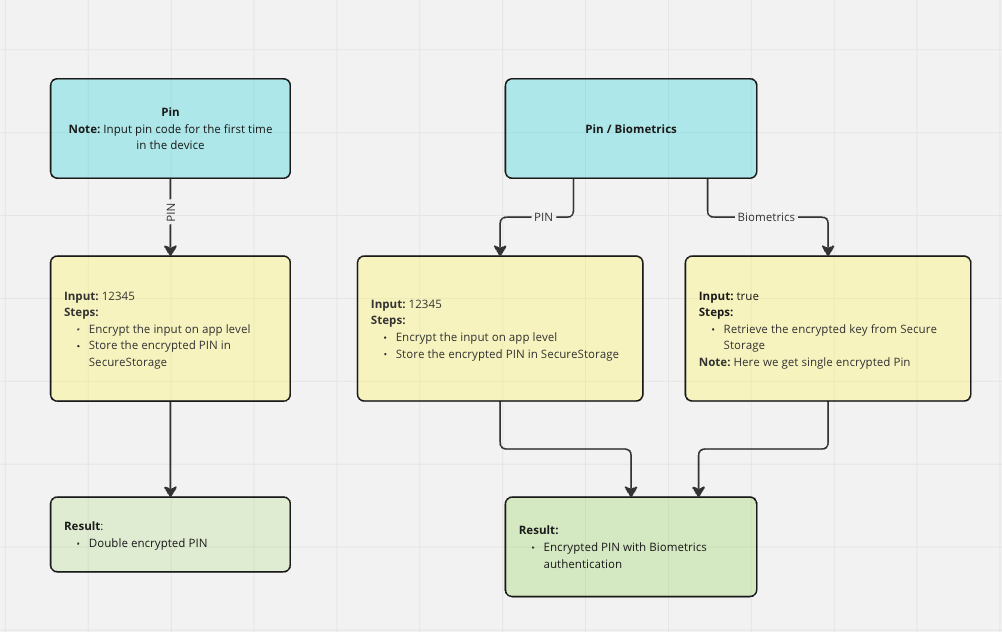
Diagram #
Setup #
Step 1: Add the widget_toolkit_pin and widget_toolkit_biometrics packages as dependencies.
$ flutter pub add widget_toolkit_pin widget_toolkit_biometrics
Step 2: Follow the integration instructions for the local_auth package in order for the plugin to work on your desired platforms.
Step 3: Pass the WidgetToolkitTheme,PinCodeTheme extensions to the ThemeData of your app:
MaterialApp(
  theme: ThemeData.light().copyWith(
    colorScheme: ColorScheme.fromSwatch(),
    extensions: [
      PinCodeTheme.light,
      WidgetToolkitTheme.light,
    ],
  ),
  darkTheme: ThemeData.dark().copyWith(
    colorScheme: ColorScheme.fromSwatch(),
    extensions: [
      PinCodeTheme.dark,
      WidgetToolkitTheme.dark,
    ],
  ),
);
To access the content of the widget_toolkit_pin, you should import the files with the following line:
import 'package:widget_toolkit_pin/widget_toolkit_pin.dart';
Note: The WidgetToolkitTheme comes from the Widget Toolkit package, which is already
present in the Widget Toolkit Pin package. It can be imported with the following line:
import 'package:widget_toolkit/widget_toolkit.dart';
Step 3: Create an implementation of BiometricsLocalDataSource, for example:
class ProfileLocalDataSource implements BiometricsLocalDataSource {
	static const _areBiometricsEnabled = 'areBiometricsEnabled';

	Future<SharedPreferences> get _storageInstance => SharedPreferences.getInstance();

	@override
	Future<bool> areBiometricsEnabled() async {
	  final storage = await _storageInstance;
	  return storage.getBool(_areBiometricsEnabled) ?? false;
	}

	@override
	Future<void> setBiometricsEnabled(bool enable) async {
	  final storage = await _storageInstance;
	  await storage.setBool(_areBiometricsEnabled, enable);
	}
}
Step 6: Create an implementation of PinCodeService. In this example we use double encryption. The
pin code is first encrypted on application level and then the encrypted value is again encrypted on
operating system level, by using the FlutterSecureStorage instance. In your implementation, you
are free to choose the types of encryption. In the example two other packages are used:
encrypt and flutter_secure_storage
In order for the flutter_secure_storage plugin to work on your desired platforms, follow the
integration instructions.
class AppPinCodeService implements PinCodeService {
  static const _isPinCodeInStorage = 'pinCode';

  FlutterSecureStorage get flutterSecureStorage => const FlutterSecureStorage();

  @override
  Future<bool> isPinCodeInSecureStorage() async {
    var isPinCodeInSecureStorage =
    await flutterSecureStorage.read(key: _isPinCodeInStorage);

    return isPinCodeInSecureStorage != null;
  }

  @override
  Future<String> encryptPinCode(String pinCode) async {
    // App specific encryption
    final key = Key.fromSecureRandom(32);
    final iv = encrypt.IV.fromSecureRandom(16);
    final encrypter = Encrypter(AES(key));
    final encryptedString = encrypter.encrypt(pinCode, iv: iv).base64;

    // Platform specific encryption, save the pin in secure storage
    await flutterSecureStorage.write(
        key: _isPinCodeInStorage, value: encryptedString);
    return Future.value(encryptedString);
  }

  @override
  Future<int> getPinLength() => Future.value(3);

  @override
  Future<bool> verifyPinCode(String pinCode) async {
    var pinFromStorage =
    await flutterSecureStorage.read(key: _isPinCodeInStorage);

    return pinCode == pinFromStorage;
  }

  @override
  Future<String?> getPinCode() async =>
      await flutterSecureStorage.read(key: _isPinCodeInStorage);
}
Step 7: Use the PinCodeKeyboard widget somewhere in your widget tree, using your implementation of
BiometricsLocalDataSource,PinCodeService:
PinCodeKeyboard(
    pinCodeService: AppPinCodeService(),
    biometricsLocalDataSource: ProfileLocalDataSource(),
    translateError: _translateError,
);
Customization #
Optionally you can provide mapBiometricMessageToString, which will be used to translate the BiometricsMessage to human readable text and will be used in the default notification:
mapBiometricMessageToString: (message) {
  switch (message) {
    case BiometricsMessage.notSetup:
      return 'To use biometrics, you need to turn it on in your device settings!';

    case BiometricsMessage.notSupported:
      return 'You don\'t have biometric feature on your device!';

    case BiometricsMessage.enabled:
      return 'Your biometrics are enabled!';

    case BiometricsMessage.disabled:
      return 'Your biometrics are disabled!';
  }
},
Optionally you can provide onError to handle errors out of the package, or to show a notification,
in practice this would only get called if the implementations of BiometricsLocalDataSource.areBiometricsEnabled(),
BiometricsLocalDataSource.setBiometricsEnabled(enable),PinCodeService.isPinCodeInSecureStorage(),
PinCodeService.encryptPinCode(), PinCodeService.getPinLength(), PinCodeService.verifyPinCode(),
PinCodeService.getPinCode(), throw.
onError: (error, translatedError) {
  showBlurredBottomSheet(
    context: context,
    configuration: const ModalConfiguration(safeAreaBottom: false),
    builder: (context) => const MessagePanelWidget(
      message: 'Could not enable biometric authentication at this time',
      messageState: MessagePanelState.important,
    ),
  );
},
Optionally you can provide addDependencies and set it to false. In this case you will have to provide
and implementation of the LocalAuthentication, PinBiometricsAuthDataSource, PinBiometricsRepository,
PinCodeBloc
addDependencies: false,
Optionally you can provide isAuthenticatedWithBiometrics where the function receives a bool value showing,
whether the user was authenticated with biometrics.
isAuthenticatedWithBiometrics: (isAuthenticated) => true,
Optionally you can provide isPinCodeVerified, where the function receives a bool value showing,
whether pin code is verified.
isPinCodeVerified: (isPinCodeVerified) => true,
Optionally you can provide deleteKeyButton, which button will be used instead of the default delete
button.
deleteKeyButton: PinCodeCustomKey(
  buildChild: (bool isPressed) => const Icon(Icons.delete),
  onTap: () {},
)
Optionally you can provide bottomRightKeyboardButton, which button will be used instead of the default delete
button and instead of the other functionalities provided from the default auto submit, biometrics scan buttons,
which are appearing on the bottom right of the keyboard.
bottomRightKeyboardButton: PinCodeCustomKey(
  buildChild: (bool isPressed) => const Icon(Icons.face),
  onTap: () {},
)
Optionally you can provide a localizedReason, this should be a localized string, which would get shown
to the user when they are prompted to confirm that they want to enable biometrics.
localizedReason: 'Activate the biometrics of your device',
Functional specifications #
When the widget is loaded for the first time on the bottom right of the page, there is no button.
At this point the biometrics for the app are still not enabled.
After at least 1 number has been selected the delete button shows up. When the length of the input
reached the pin code length the button icon disappears. The pin code is encrypted stored in the
local device secure storage. Then, there is an auto submit of the selected
pin code to the backend for verification. After the pin has been saved successfully in the secure
storage, the biometrics icon appear on the bottom right. When you press it, it triggers enabling
of the biometrics event. The local authentication from the local_auth package is triggered.
The user is asked, if he/she wants to allow the app to use biometrics authentication. When you click
ok, the biometrics authentication is triggered. When it is successful, on the screen is displayed
a message that the biometrics are enabled. The next time when restart the app, because the pin code
will be stored in the device secure storage, the biometrics authentication will be automatically
triggered and the biometrics icon will be displayed on the bottom right. When you press it every
time it will trigger the biometric authentication. If a user types a wrong pin code and the error
ErrorWrongPin is thrown from the service layer, then a shake animation is triggered on the masked
pin code and then the text from the ErrorWrongPin's errorMessage is displayed in the place of the
pin code. Note: If biometricsLocalDataSourceparameter is not provided to PinCodeKeyboard the
biometrics authentication feature cannot be used.
Metadata
Publisher
Weekly Downloads
Metadata
This package provide out of the box entering PIN code functionality, which can be used with biometric authentication.
License
![]() unknown (license)
unknown (license)
Dependencies
app_settings, flutter, flutter_rx_bloc, flutter_svg, local_auth, provider, rx_bloc, rx_bloc_list, rxdart, shared_preferences, theme_tailor_annotation, widget_toolkit, widget_toolkit_biometrics